Lab - Compose a Simple Fraud Check into a Workflow
Author:
Fluent Commerce
Changed on:
16 Jan 2025
Overview
This module will guide you through a hands-on lab where you can put all of the theory to practice and implement a simple Fraud Check solution. This will cover adding new business logic to your workflow, including configuring some user actions to enable business users to approve or cancel orders that have been flagged as potentially fraudulent.
Key points
- For this lab you will need:
- Postman application installed
- A Fluent Commerce training account
- A Postman environment file corresponding to your your Fluent Commerce account
- This Lab uses the fc_sports_admin retailer, please make sure to use this retailer when logging into your Fluent Commerce training account
Download & Setup Postman
Please follow the steps below to download, setup, and sign in to the Postman app:
- Go to https://www.postman.com/downloads/ and download the Postman application installer (the Free version is sufficient for these purposes).
Note: We do not recommend using the web-only version, which can result in CORS errors during the course labs! - Install the downloaded file using the relevant instructions below:
- Windows:
- Run the setup and follow the instructions provided
`exe`
- Run the setup
- Mac:
- Extract the file, and drag the postman.app file into your Applications folder
`zip`
- Extract the
- Linux:
- Extract the file and move it to your desired Application location
`tar.gz`
- Extract the
- Windows:
- Open the Postman app, and either sign in with your existing Postman account details, or if you do not yet have an account, create a free Postman account, verify, and sign in
Create a new Workspace
Follow the steps below to create a new Workspace (video below the instructions):
- You should have received an email from Fluent Learning with the subject "Training Account Credentials". Download the postman environment file as instructed, and take note of the first part of the file name.
For example: If the file name is, the Training Account Id is`FCTRAINAU123.SANDBOX.postman_environment.json`. Note your own Account Id for the next steps.`FCTRAINAU123` - From the Postman Home screen, click on the Workspaces tab, and then the Create Workspace button, as shown below:

Fill in the details as per below:
- Name your workspace using your own Account Id from step 1. E.g: FCTRAINAU123
- Make sure to select Personal Workspace
- If both the above are correct, click Create Workspace
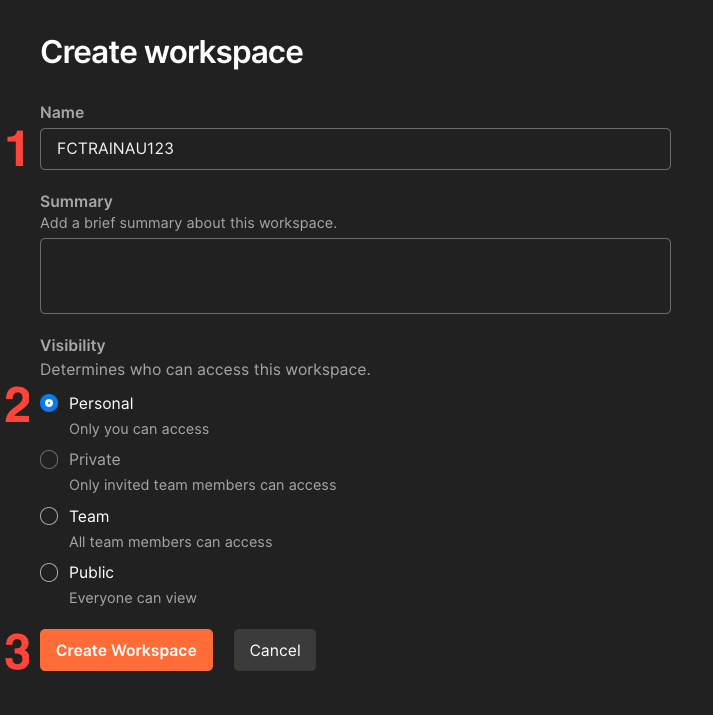
Postman Workspace
This video gives an overview of the Postman workspace
Import your Training Account Environment file:
Now that you have created a new empty workspace, it is time to import your Training Account Environment file which you previously downloaded in the previous module. E.g:
`FCTRAINAU123.SANDBOX.postman_environment.json`1. Click on the Import button as shown below:
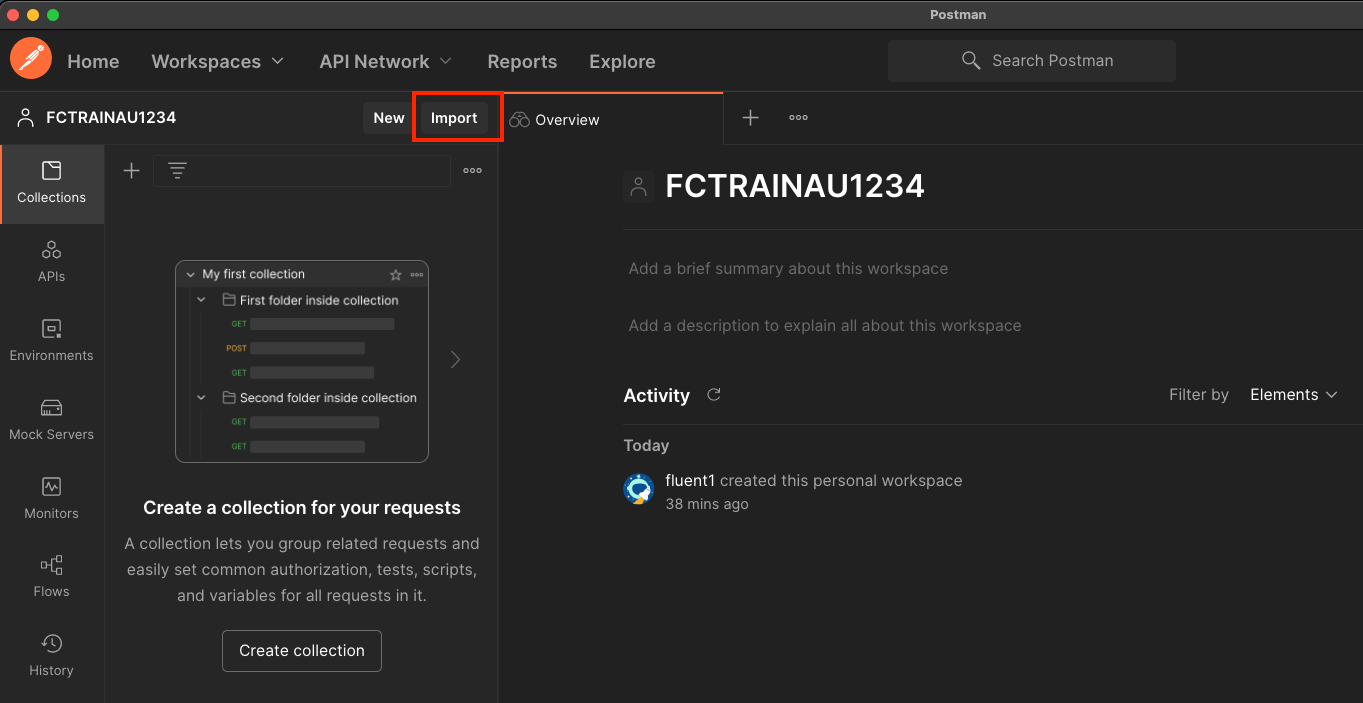
2. When the import screen opens, either drag and drop the environment file onto the space provided, or click on the Upload Files button and navigate to select your environment file. Once selected, it should look like this:
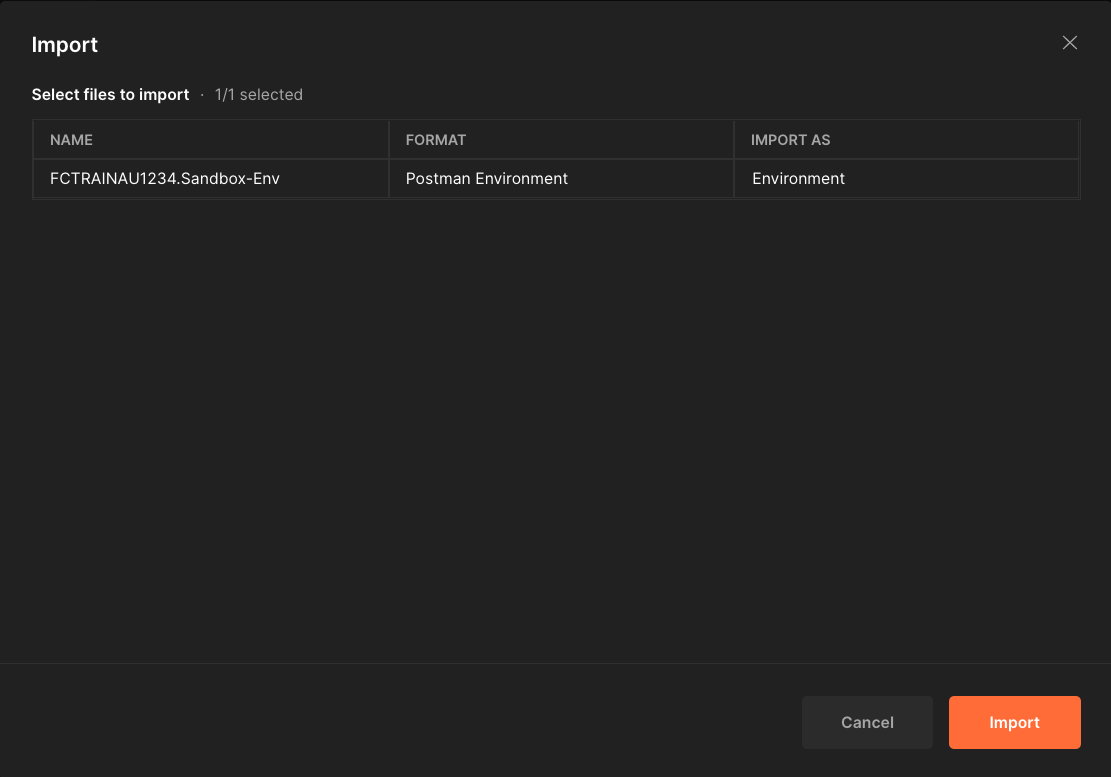
3. Click on the Import button, and wait for a green pop out message to confirm successful import.
4. You now need to select the Environment file in your workspace, so click on the drop down on the top right where it says "No Environment". You should see your new Environment file available for selection. Click to select it.
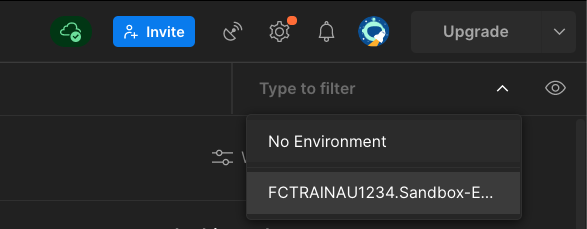
5. Finally, to view your Environment file details, you can click on the little "eye" icon next to the drop down on the right to see a quick popup preview. Alternatively, on the left hand side navigation, click on Environments, and then the environment file name. This will open the environment file in the main window view:
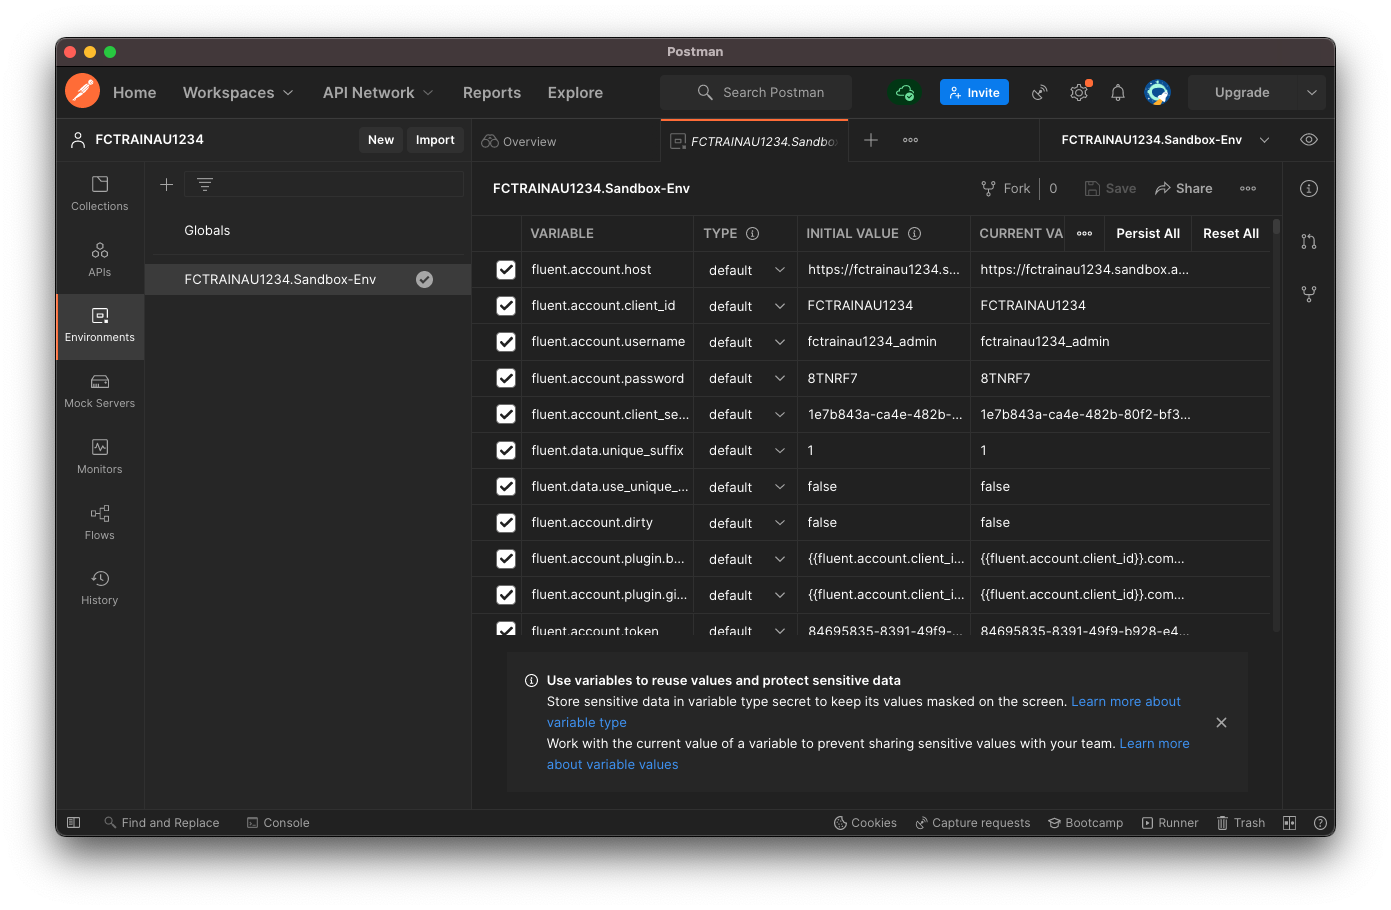
Postman Environment Import
This video shows how to import a Postman Environment
Import the Workflow Framework Labs Collection
Import the Labs Collection file
Now, that you have your Environment file imported, you need to import the Training Labs Collection:
1. Right click here to save the file on your computer: Fluent Learning - CF-WF1 Labs.postman_collection.json
2. Click on the Import button as you did in the previous module
3. Drag and drop, or click on the Upload Files button, and select the downloaded collection file from Step 1:
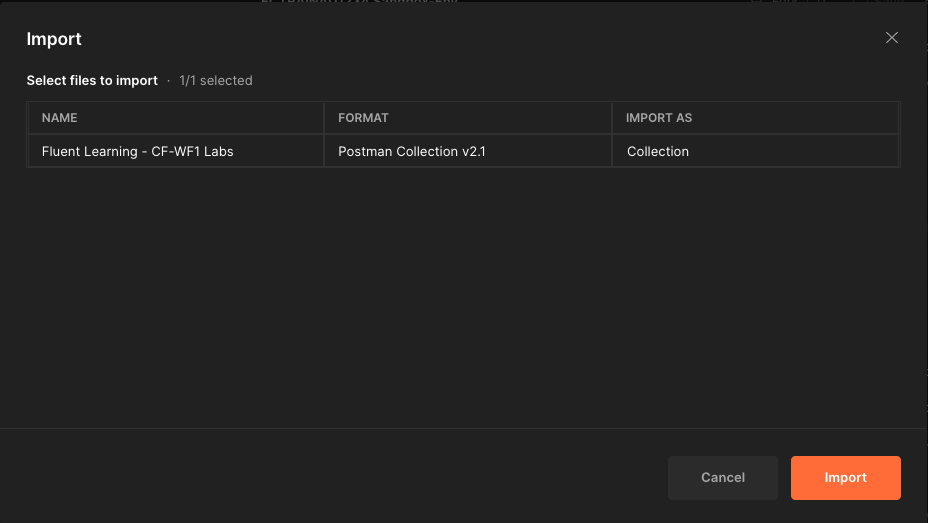
4. Click Import, wait for the green success pop out, and then click on the Collections tab in the left navigation:
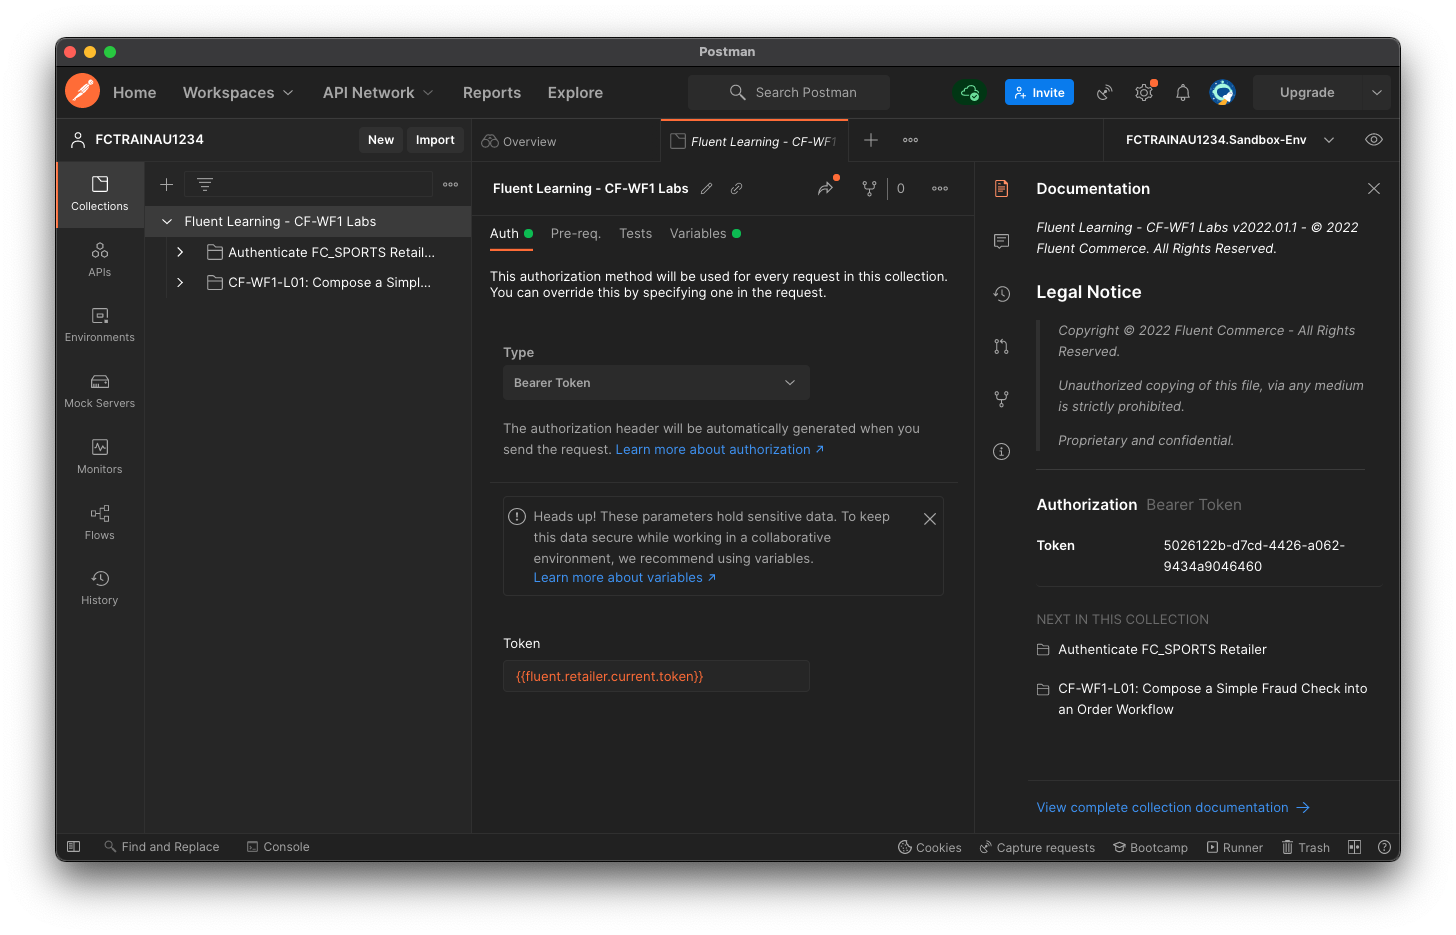
Importing a Postman Collection
This video shows you how to import a Postman Collection
Lab - Verify Postman Setup
Important: This lab provides the steps to be completed prior to attempting the upcoming Lab.
Please verify your successful setup of Postman, including the import of both the Training Account Environment file, and the Workflow Framework Labs Collection file.
To complete this assignment, click on the Your Response / Notes tab above, and type one of the following responses into the Text Response:
Option 1:
If you have Postman installed, and your Environment and Collection file successfully imported, type "I have Postman working!"
Option 2:
If you DO NOT have Postman installed, or your Environment and Collection file IS NOT successfully imported, type "I need help to complete Postman Setup!" AND select one of the following instructors in the dropdown list: Dominik, Movyn or Randy
Click Submit.
You are now ready to attempt the Lab in the next module.
Lab - Compose a Simple Fraud Check into a Workflow
Learn how to modify a workflow using the Workflow Builder.
Note: This hands on Lab utilises the Fluent Learning - CF-WF1-Labs Postman Collection, the Workflow Builder (aka Orchestration Modeller) inside Fluent Admin Console, and the Fluent OMS web app.
Follow the steps below carefully, and make sure to complete each step in sequence.
Task 1: Prepare the Workflow
For this task, we will use a very simplified Click and Collect Order workflow. This will create a new version of the ORDER:CC workflow.
1. Using Postman, authenticate using the FC_SPORTS Retailer
2. Send the Simple ORDER::CC Workflow - Initial State request
3. Log in to Fluent Admin Console (https://[YOUR_ACCOUNT_ID].sandbox.console.fluentretail.com) with your Retailer credentials (username: fc_sports_admin).
Note: You can locate your password in your Postman Environment file. Locate the fluent.retailer.fc_sports.user.password environment variable to copy the password:

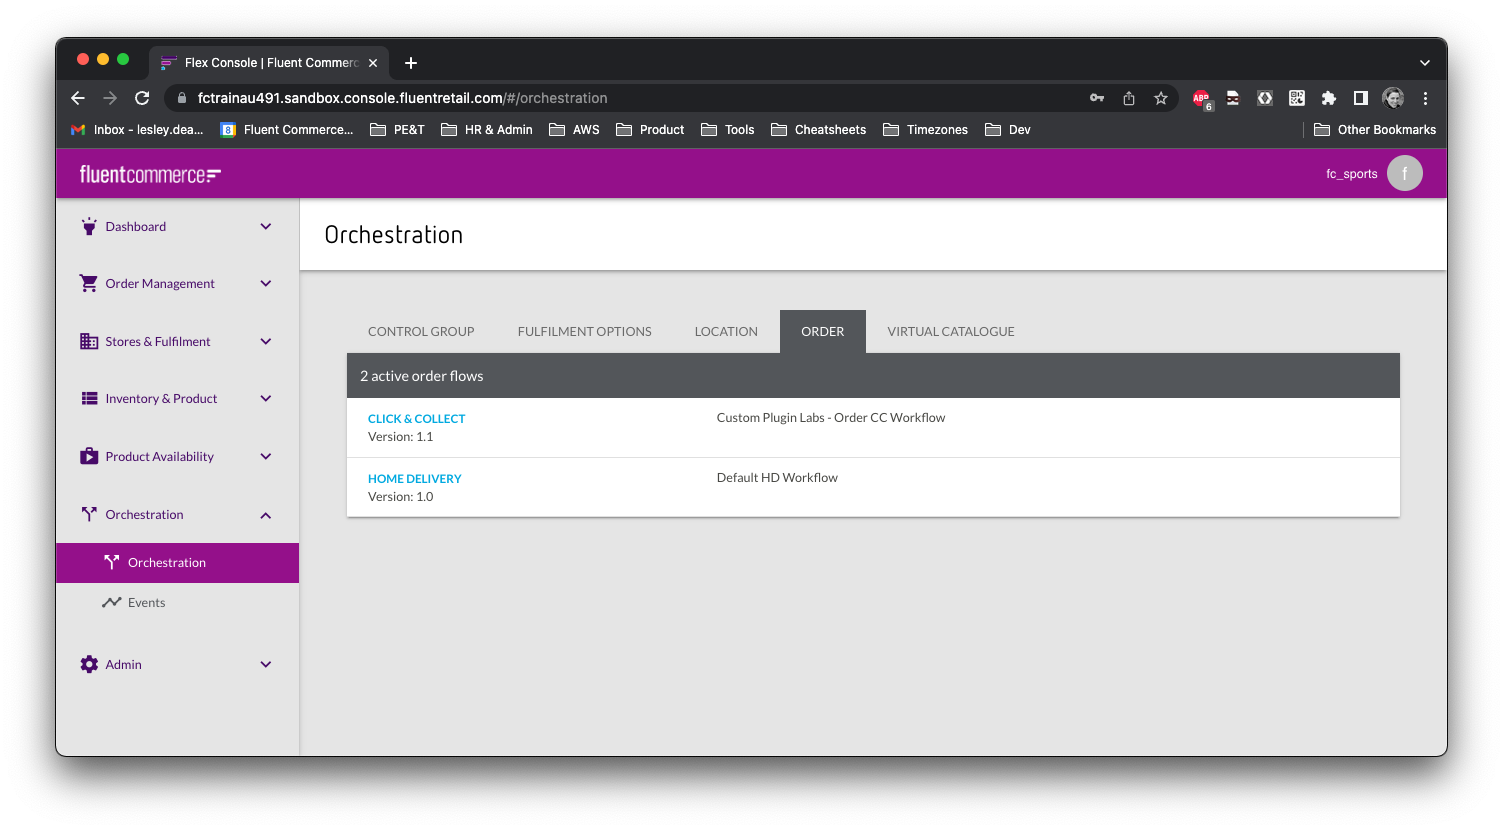
4. Navigate to the Orchestration menu, and open the ORDER:CC Workflow.
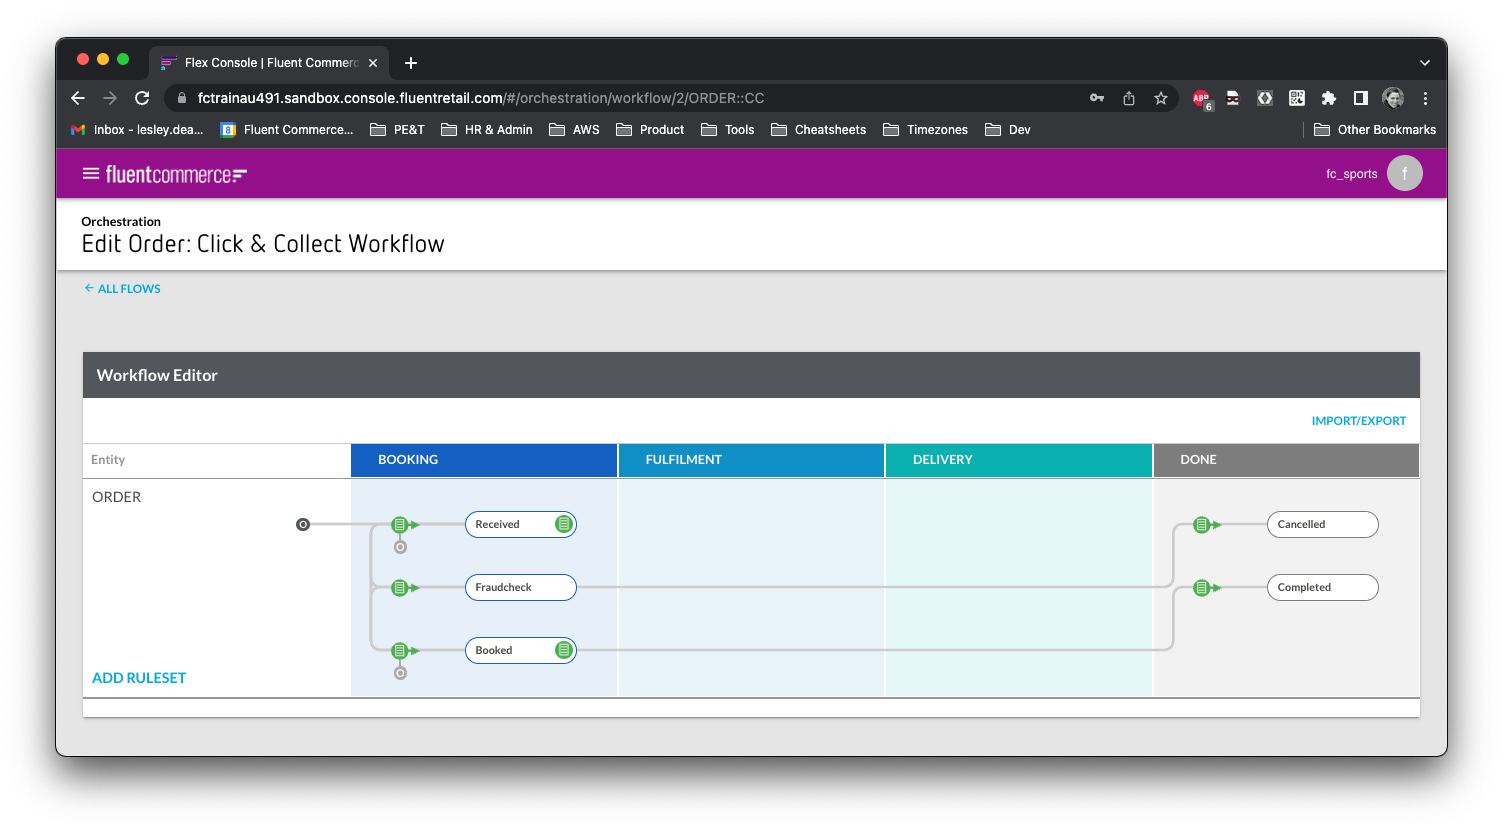
5. Confirm that your Workflow looks like this:
Task 2: Compose the Fraud Check Logic in the Workflow
Note: This is a simplified use case, and not a fully fledged Fraud Check use case. This is simply used to demonstrate and provide some sample context to the Workflow Framework Configuration course.
In this task, we implement our business logic in the workflow by configuring a logical gate Ruleset to evaluate a simple Order Attribute.
In our Client scenario, Orders sent to the Fluent Order Management system may contain an attribute called FRAUD_CHECK_REQUIRED to inform the workflow of whether the Order can be automatically booked, or whether a human intervention is required to check the Order for possible fraud.
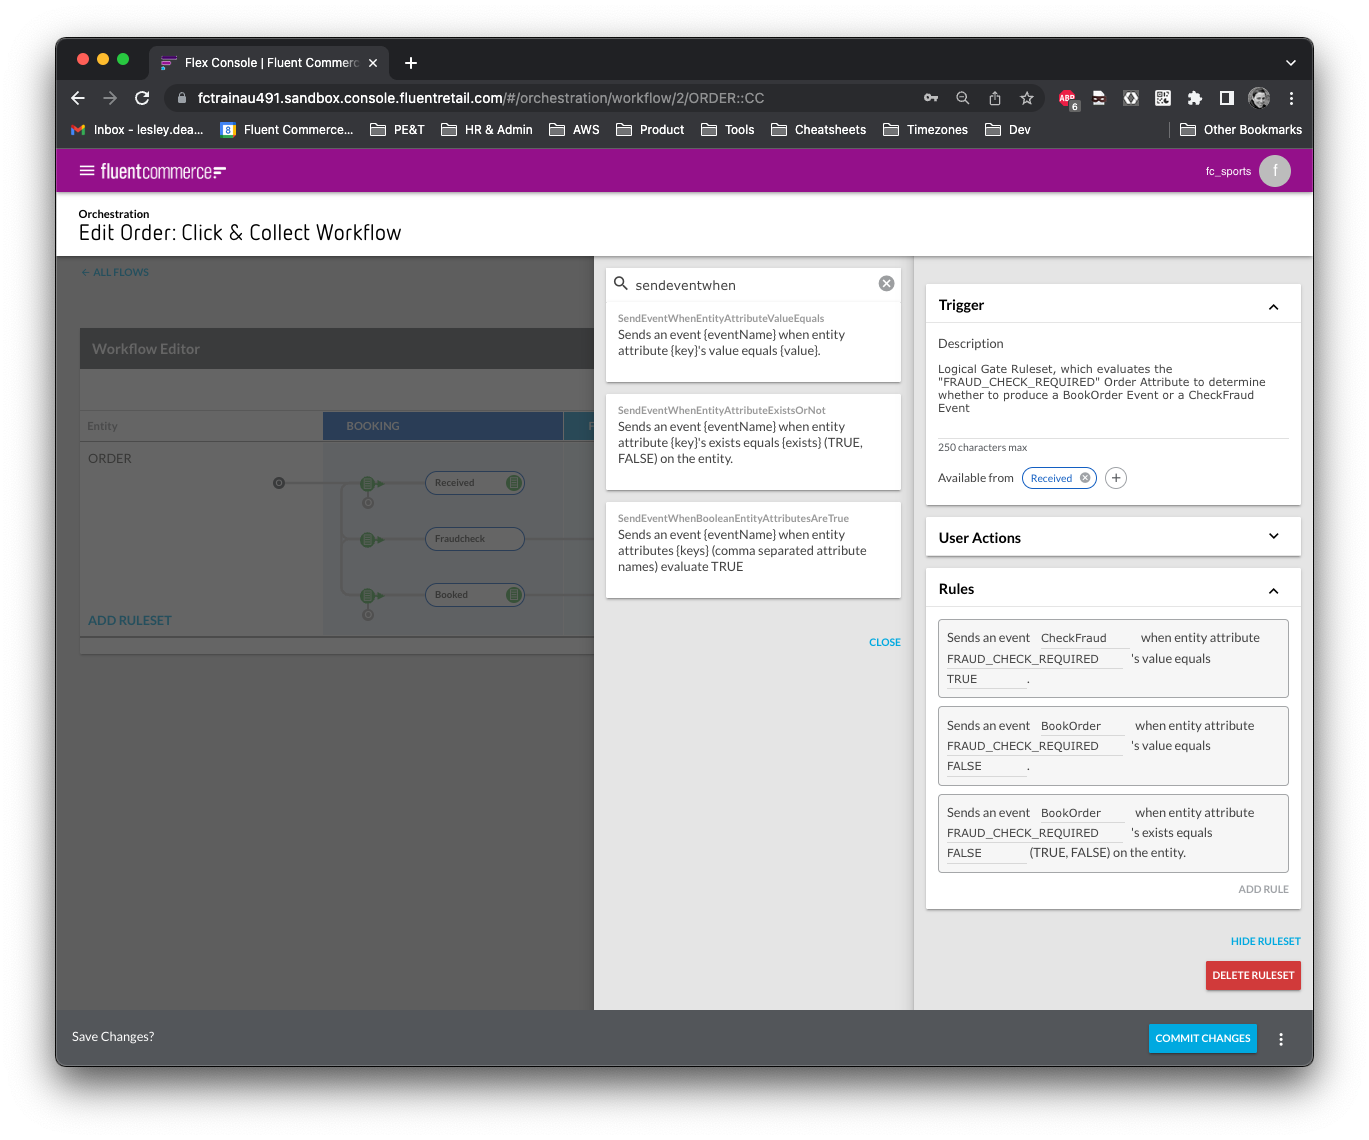
1. Click the Add Ruleset button, name it ValidateOrder, click Save, and configure the Ruleset as follows:
- Description: Checks whether the incoming order is flagged for FraudCheck
- Trigger State: RECEIVED
- Add Rule and Search “sendeventwhen”
- Add 1 instance of SendEventWhenEntityAttributeExistsOrNot and configure: BookOrder, FRAUD_CHECK_REQUIRED, FALSE
2. Add 2 instances of SendEventWhenEntityAttributeValueEquals and configure:
- The first rule instance: BookOrder, FRAUD_CHECK_REQUIRED, FALSE
- The second rule instance: CheckFraud, FRAUD_CHECK_REQUIRED, TRUE
3. Commit Changes
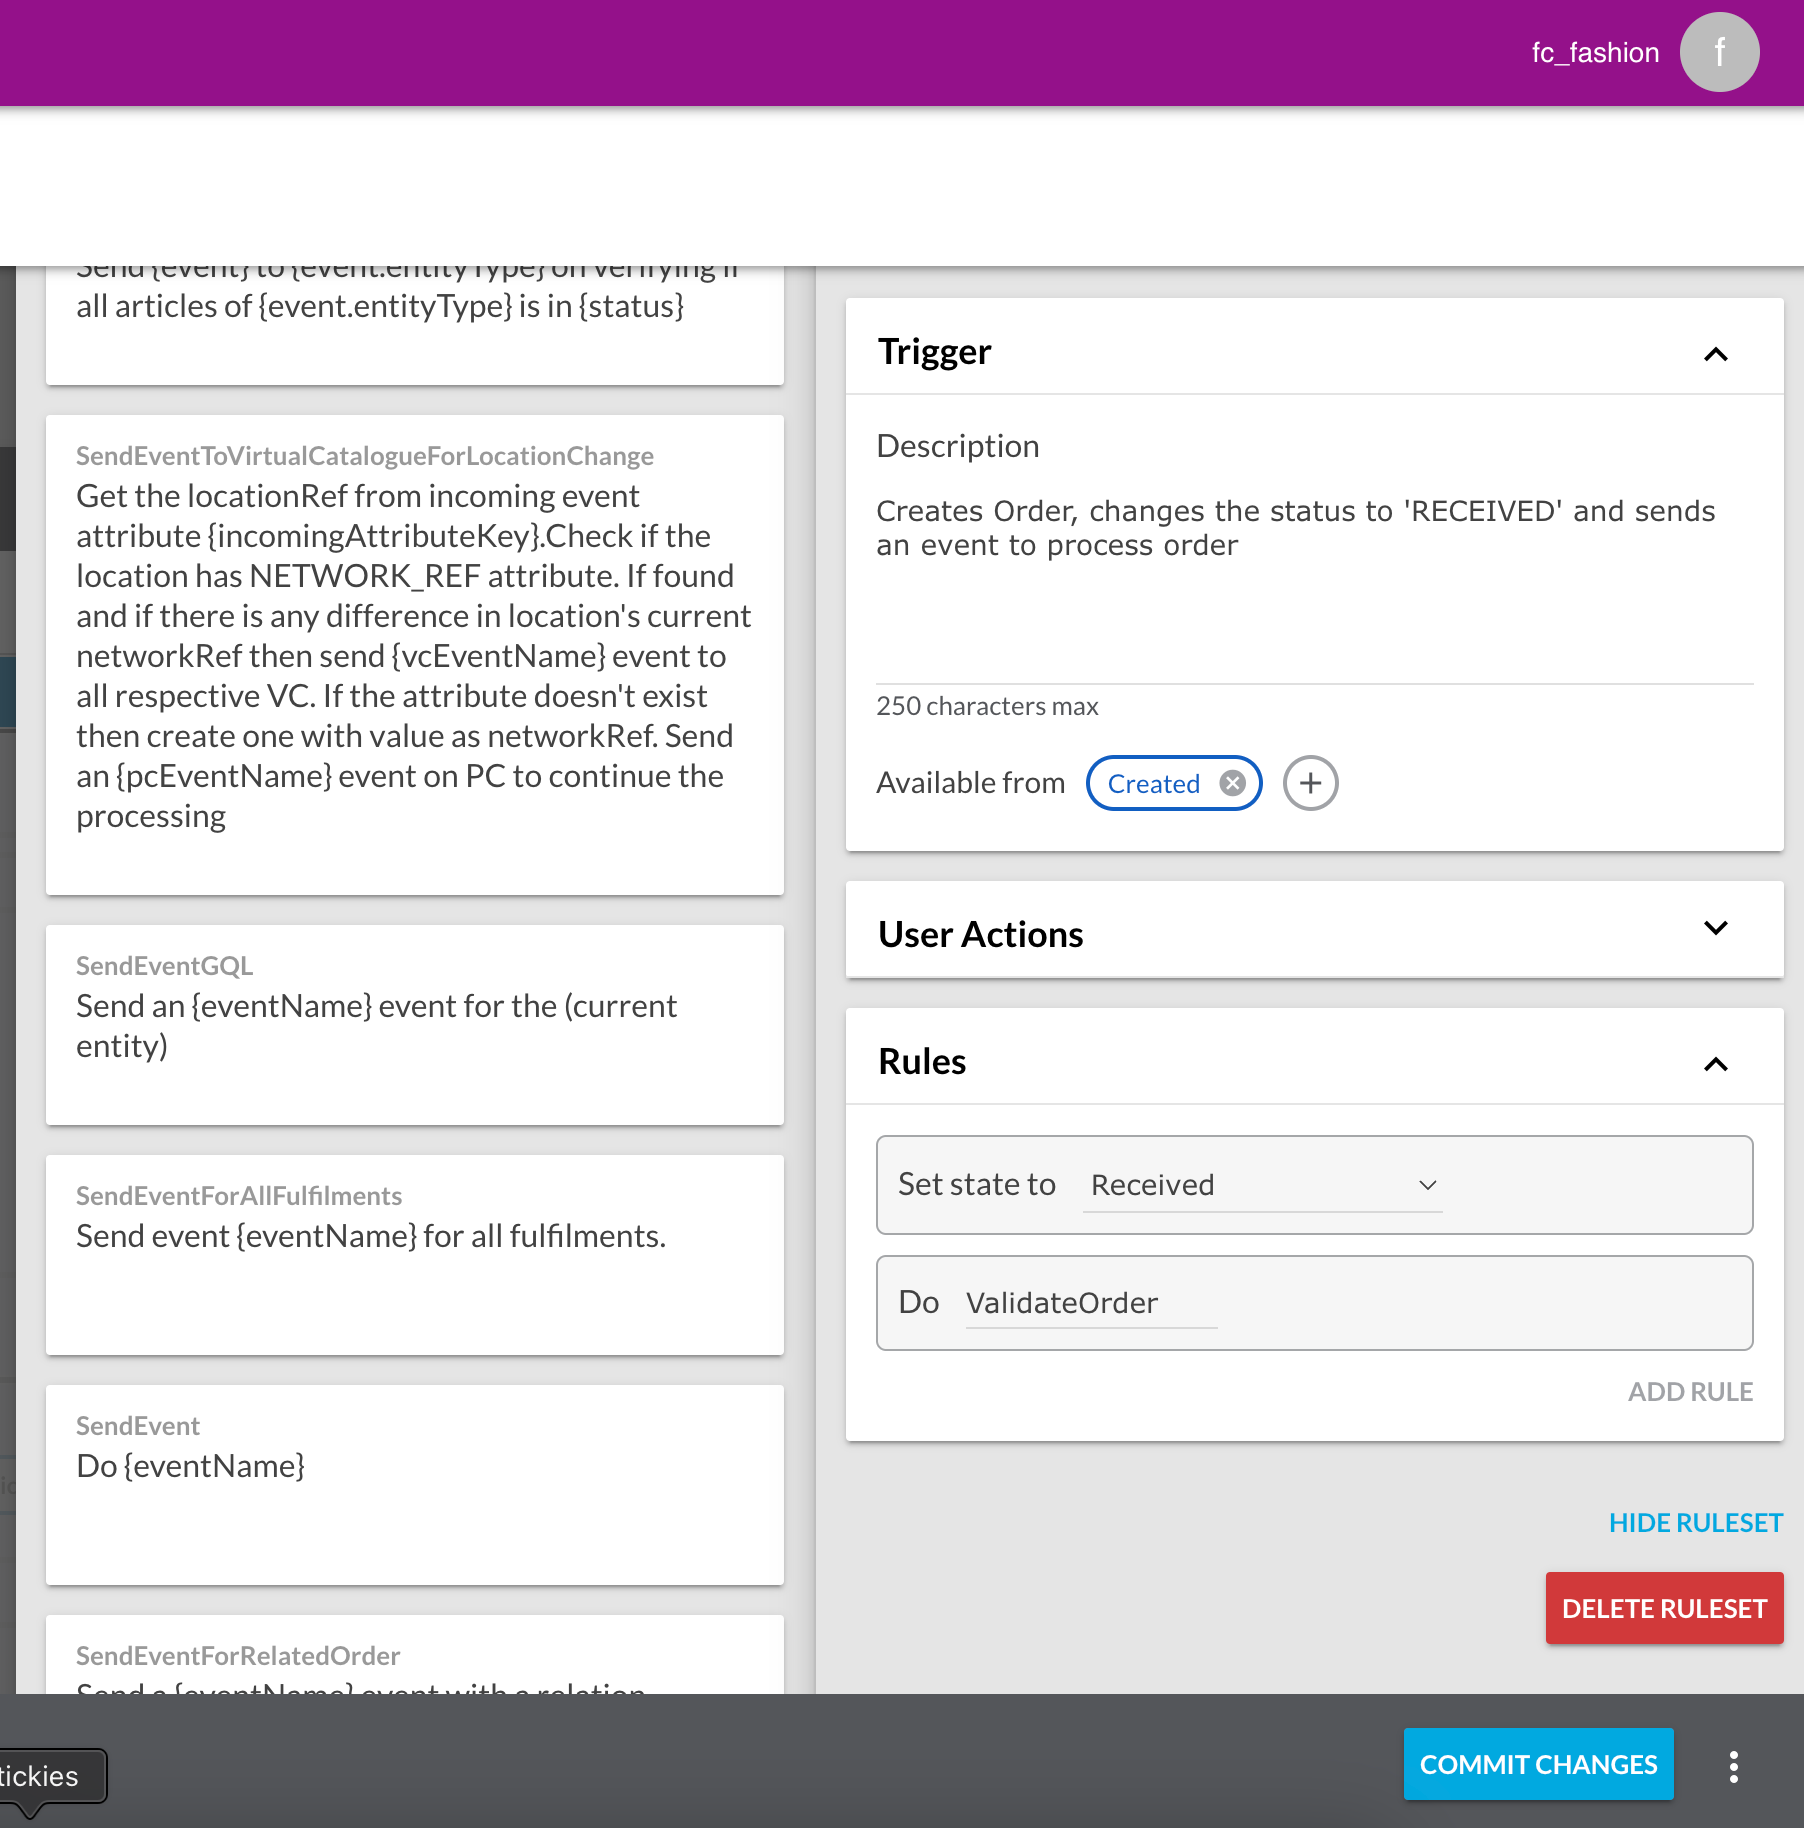
4. Go to the CREATE Ruleset and update the SendEvent Rule parameter to send event ValidateOrder
5. Commit Changes
Task 3: Test the Workflow
In this task, we will send 3 different Orders in to the Fluent Order Management system via GraphQL API, and test that our workflow logic is working as expected.
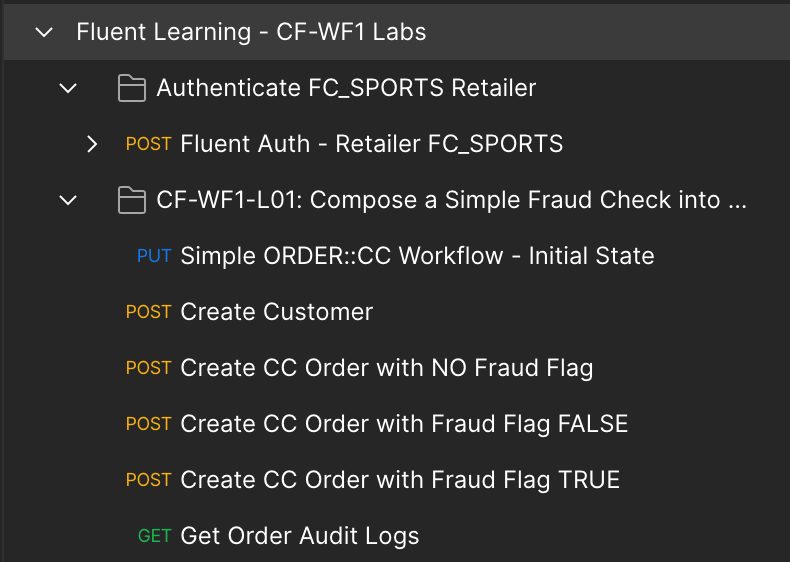
1. Inside the Postman Collection folder CF-WF1-L01, create a new customer by sending the Create Customer request
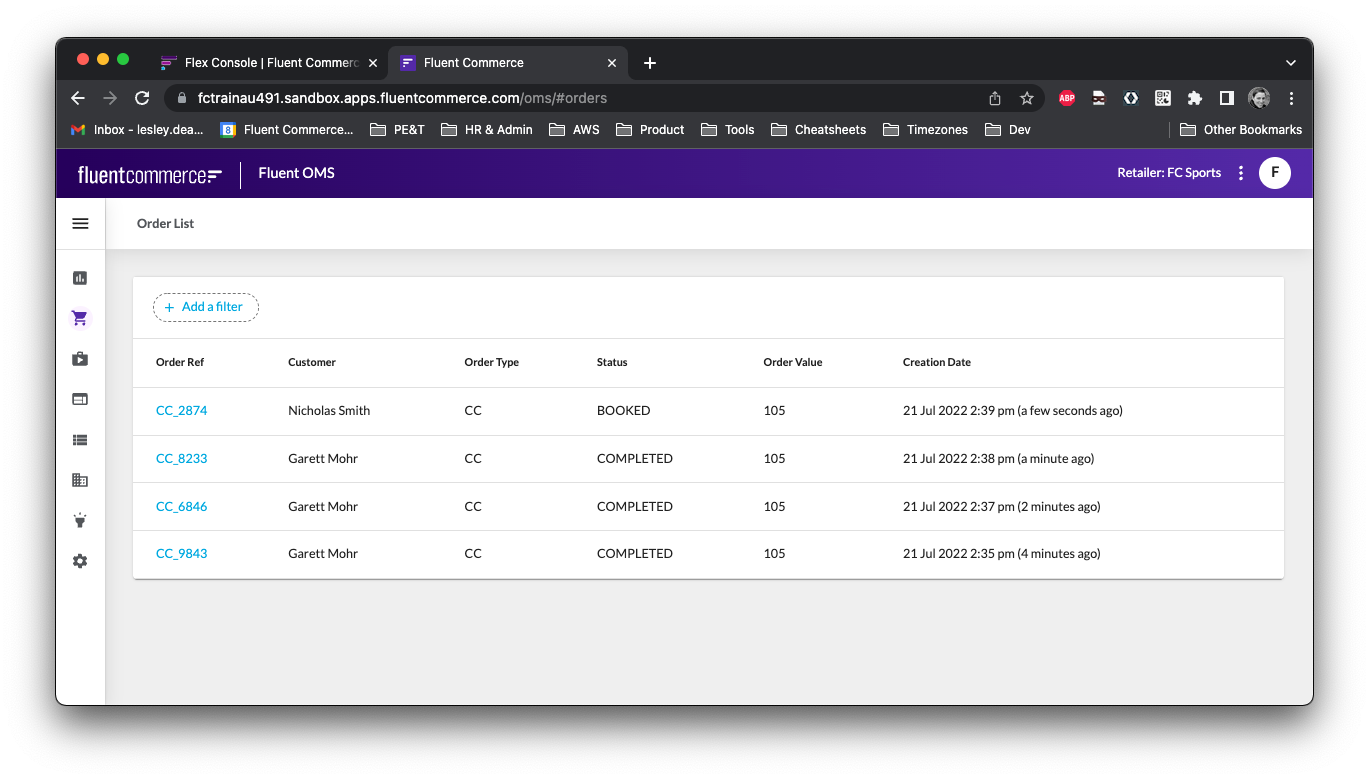
2. Let's first create an Order with no FRAUD_CHECK_REQUIRED attribute, and confirm that it is successfully BOOKED. Click on the Create CC Order with NO Fraud Flag request and click Send. We expect this Order to go to a Booked status, since our logic should book immediately if the FRAUD_CHECK_REQUIRED attribute is not present on the Order.
3. Log in to Fluent OMS: https://[YOUR_ACCOUNT_ID].sandbox.apps.fluentcommerce.com/oms/ with your fc_sports_admin Retailer user, and view the Orders List. Confirm that your Order has a BOOKED status:
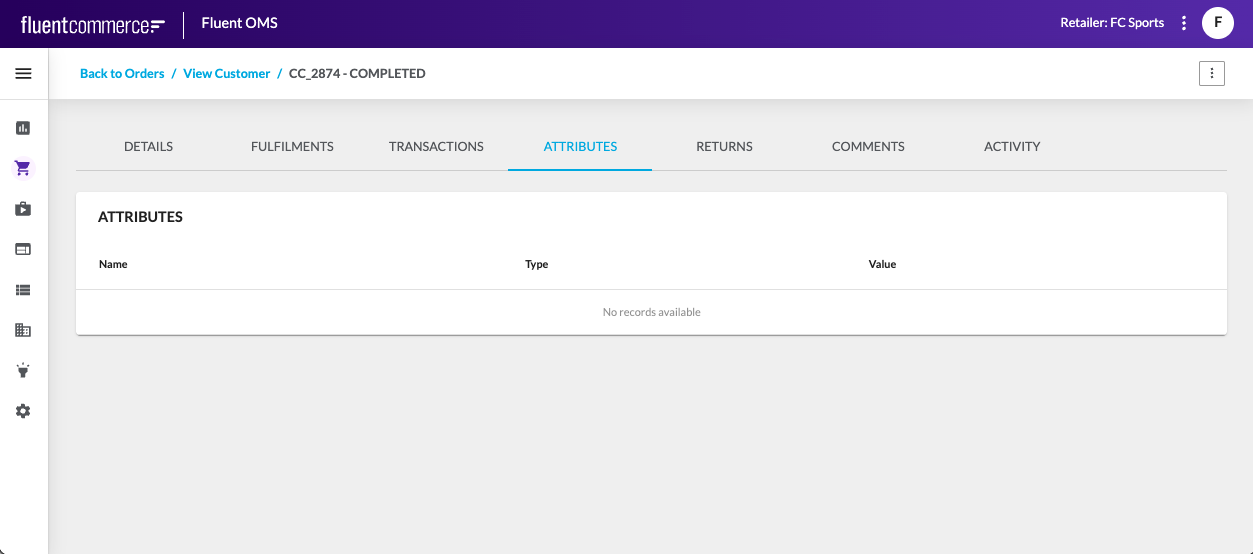
4. Click on the Order Ref, and click on the Attributes tab. You should not see any Attributes in the list:
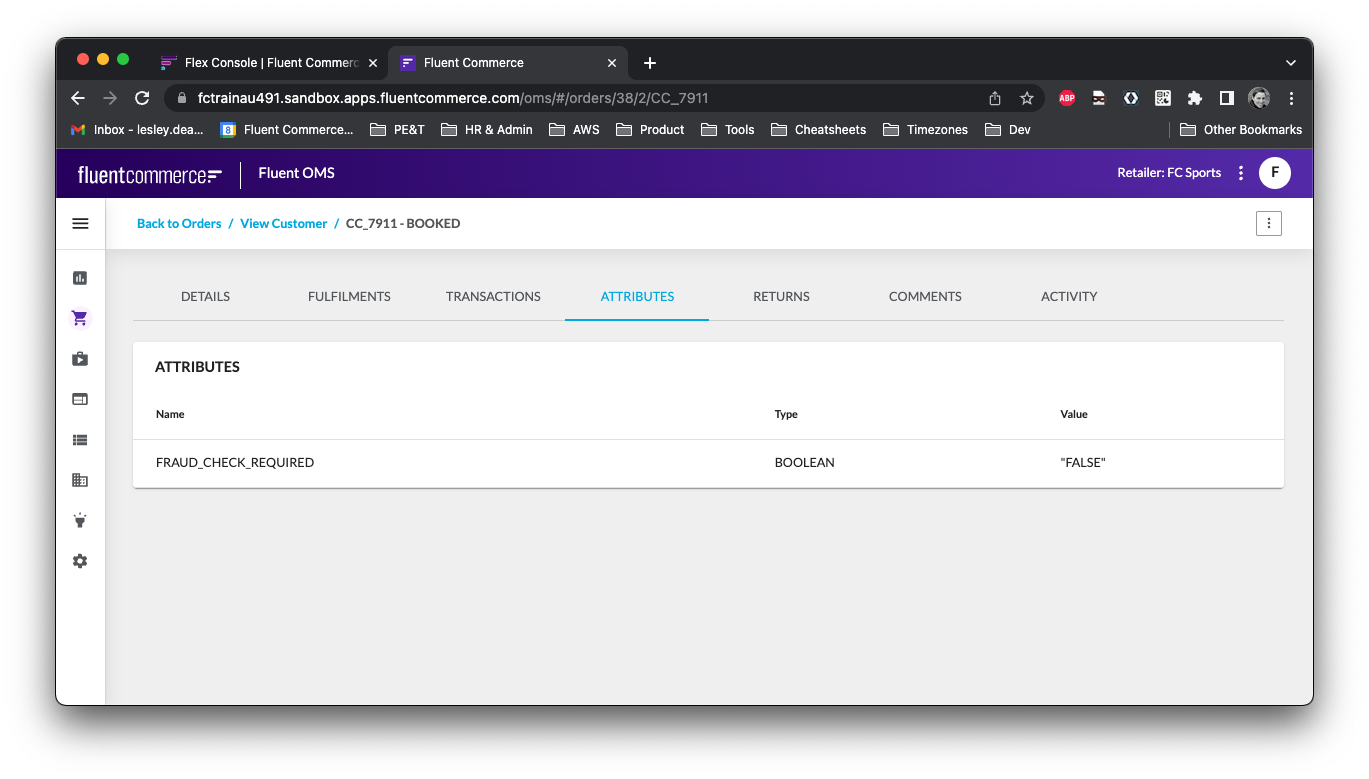
5. Next we'll create an Order that contains the FRAUD_CHECK_REQUIRED attribute on it, but set to FALSE: Click on the Create CC Order with Fraud Flag FALSE request in the Postman Collection and Click Send.
In Fluent OMS we expect this Order to go to a BOOKED status and contain the FRAUD_CHECK_REQUIRED attribute with a value of FALSE:
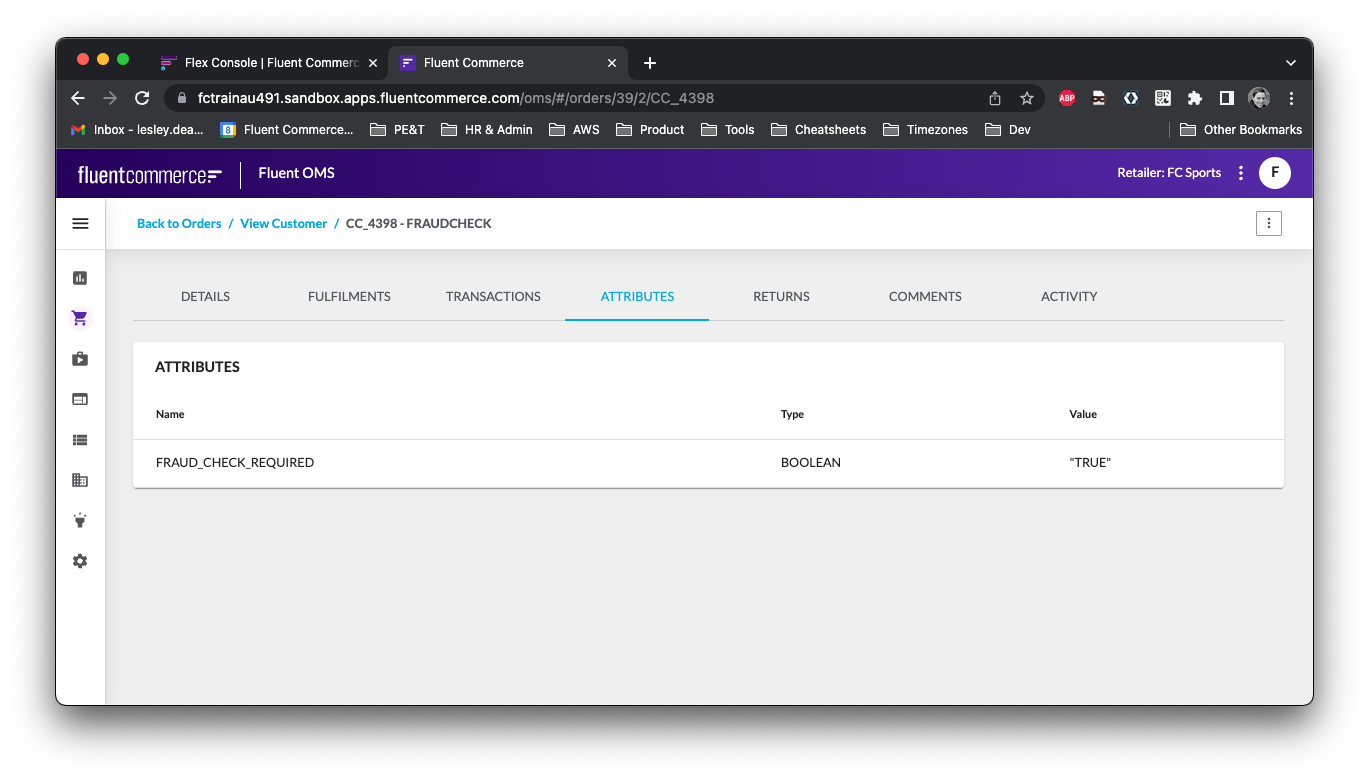
6. Finally, we'll test sending an Order with a FRAUD_CHECK_REQUIRED attribute set to TRUE. Click on the Create CC Order with Fraud Flag TRUE.
In Fluent OMS, confirm that the new Order is in a FRAUDCHECK status and shows the FRAUD_CHECK_REQUIRED attribute with a value of TRUE:
Task 4: Build User Actions
In this task, we will now implement the user actions to support a user reviewing and either approving or cancelling the Orders in a FRAUDCHECK status.
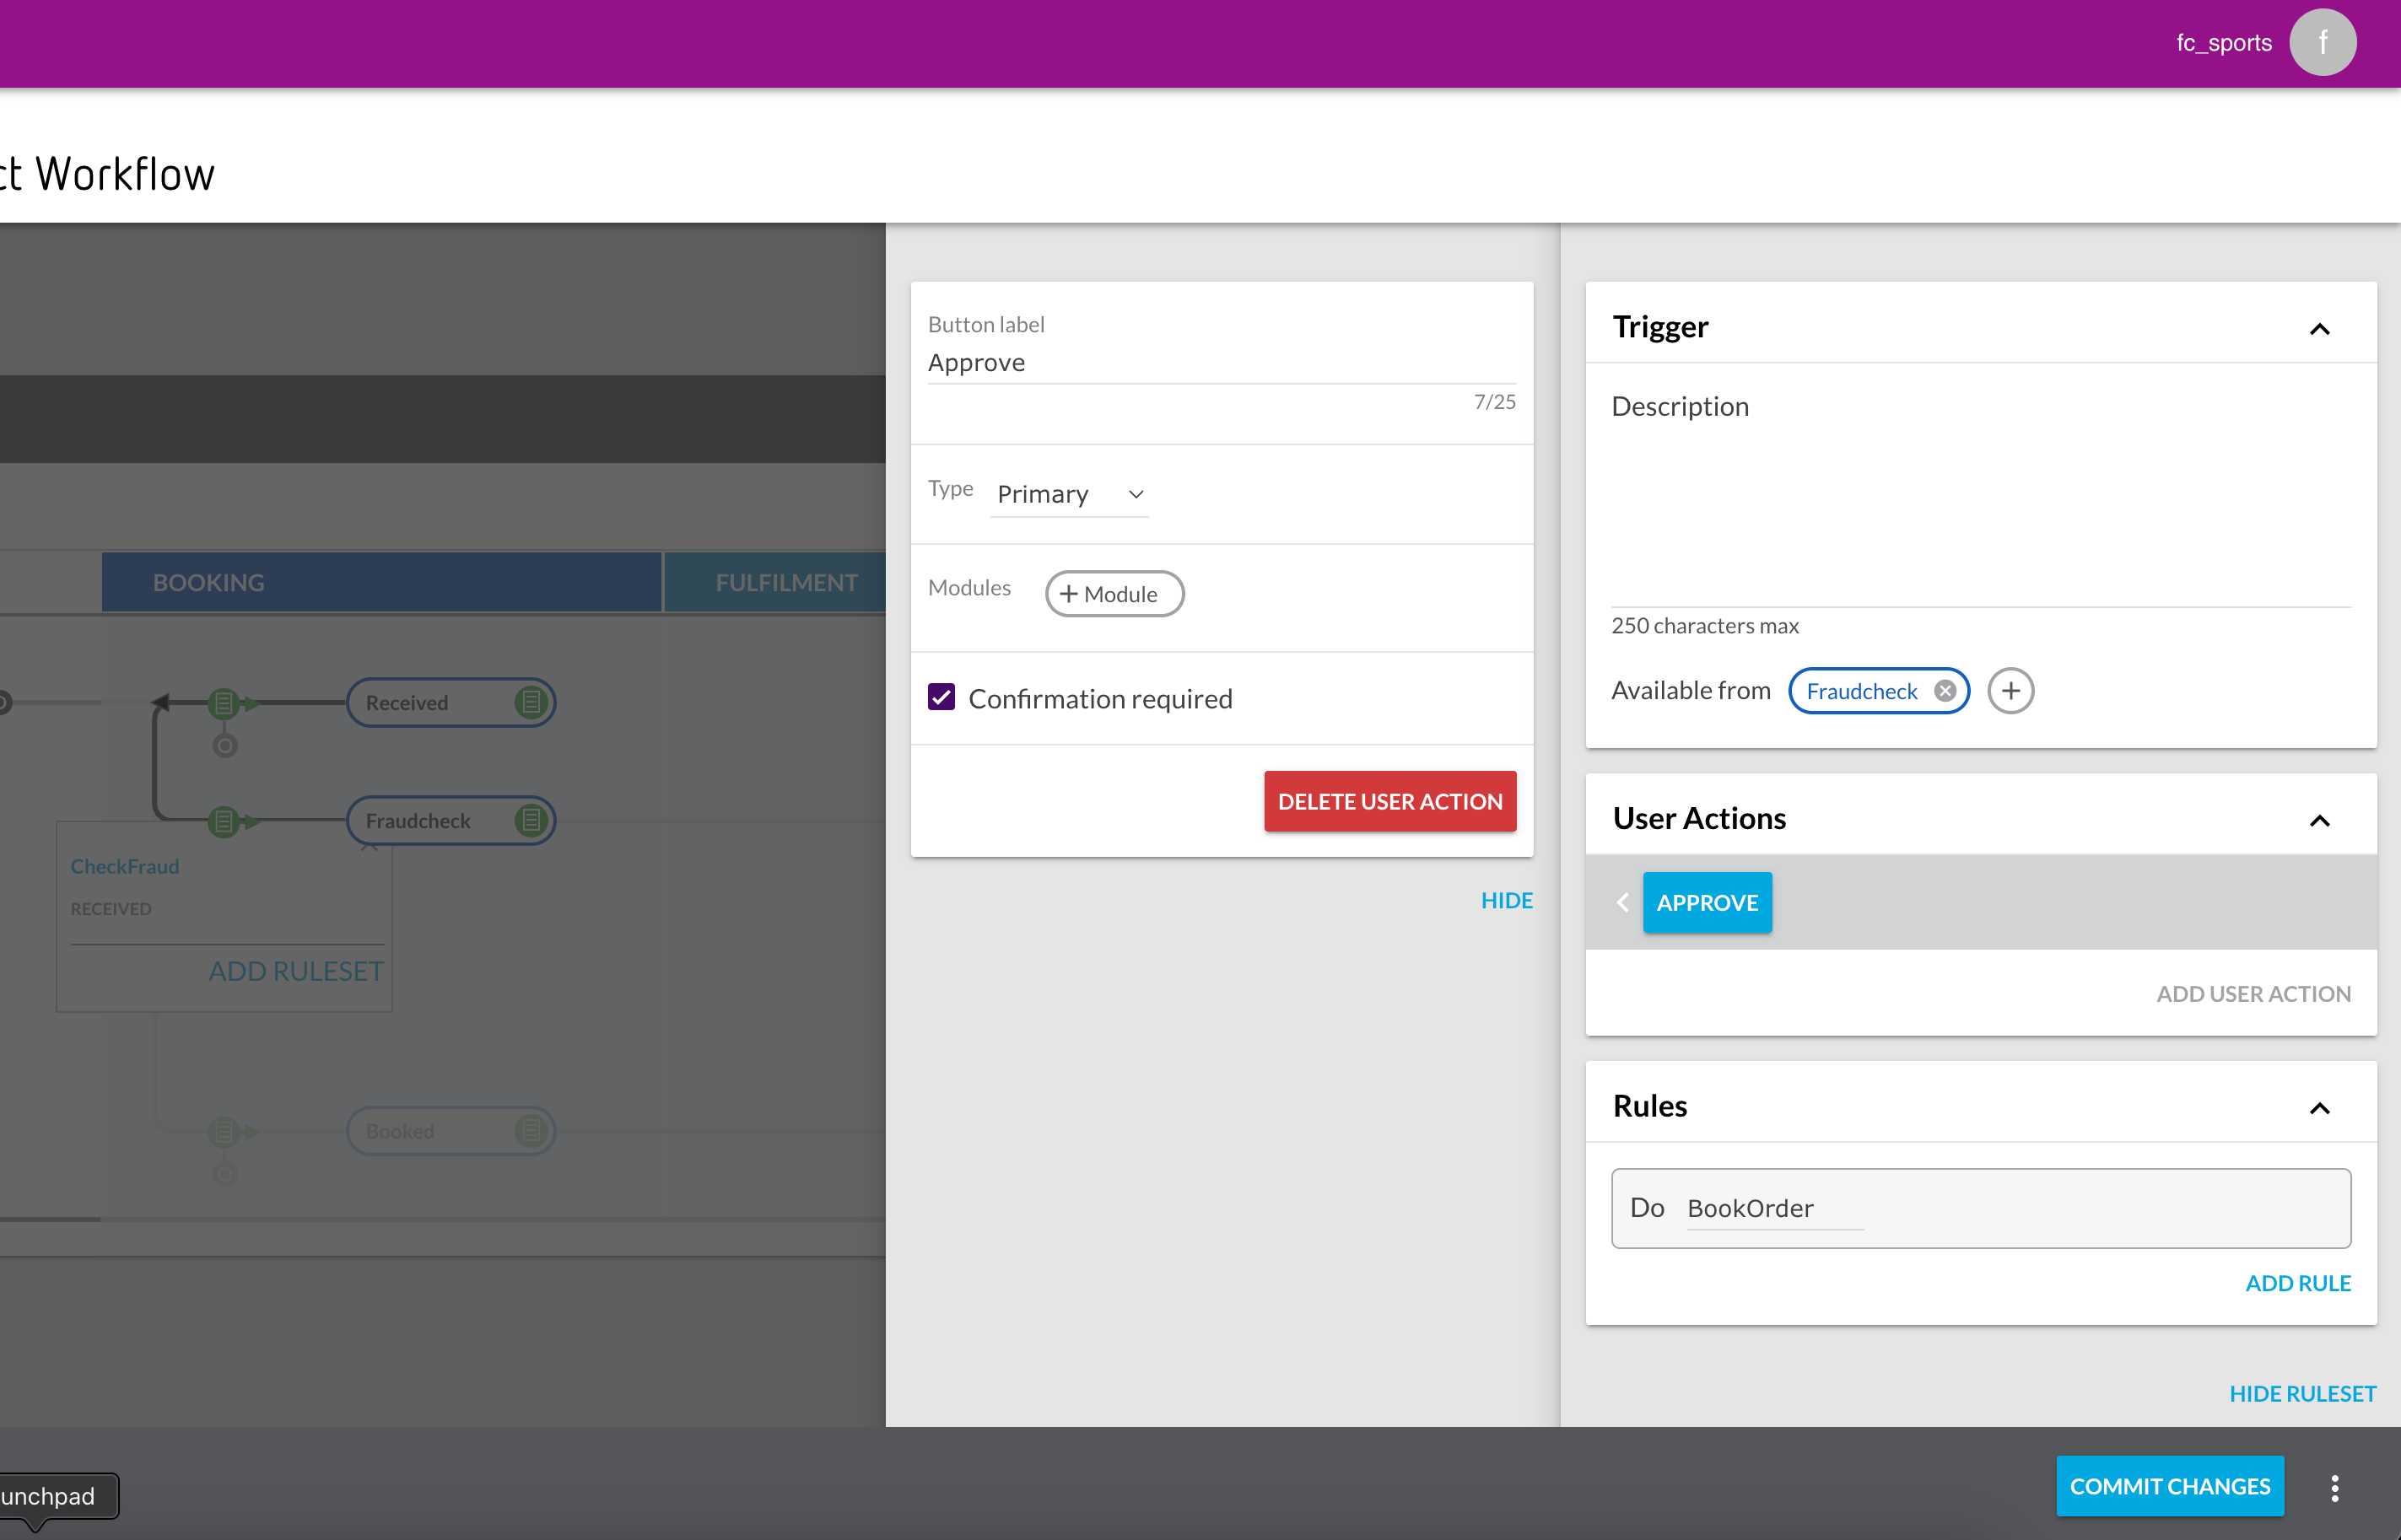
ApproveOrder Action
1. Go back to the Builder and Add new Ruleset: ApproveOrder
- Trigger State: FraudCheck
- Add Rule SendEvent and configure BookOrder
2. Add User Action:
- Button Label: Approve
- Primary
- Console
- Tick Confirm checkbox
3. Commit Changes
CancelForFraud Action
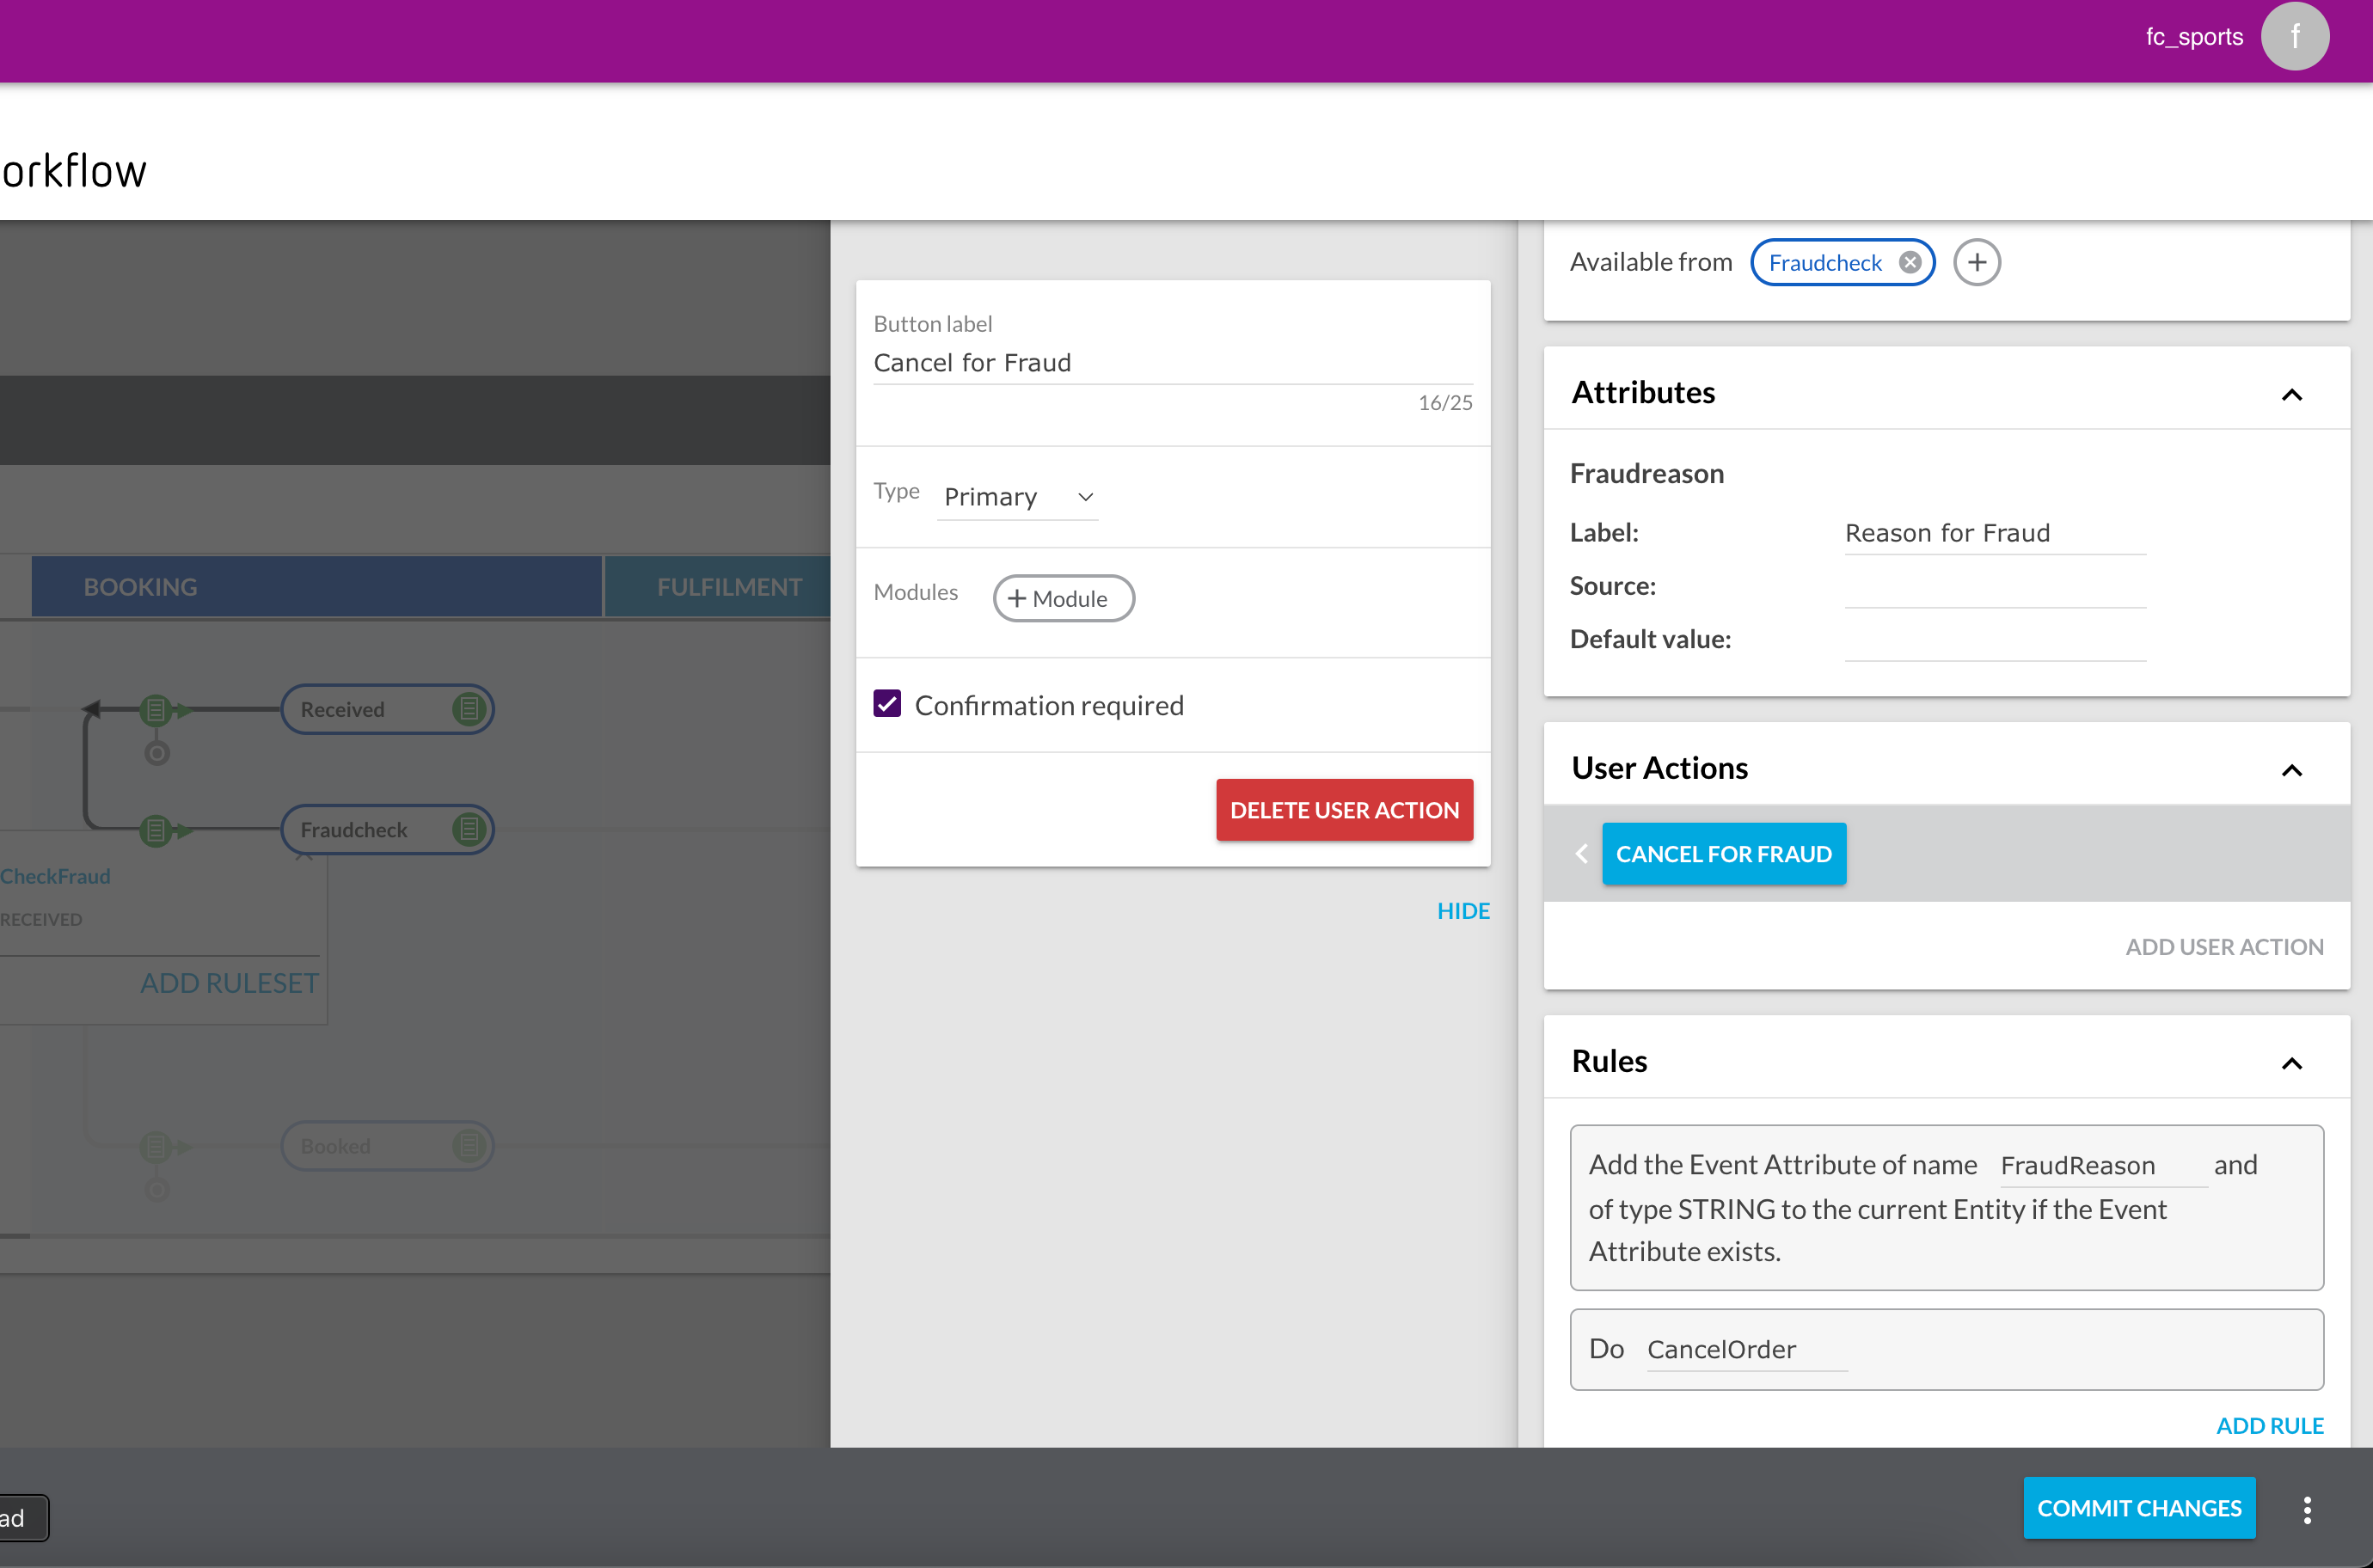
1. Add another new Ruleset: CancelForFraud
2. Trigger State: FraudCheck
3. Add Rule, search for “AddString”, select the AddStringEventAttributeToEntity rule and configure: FraudReason
4. Add Rule SendEvent and configure: CancelOrder
5. Add User Action:
- Button Label: Cancel for Fraud
- Secondary
- Console
- Do not tick the Confirm checkbox
6. Configure Attribute:
- Label: Reason for Fraud
- Leave the Source and Default fields blank - these are only required if a dropdown reason list is required. If not provided the prompt will ask for free text to be entered
7. Commit Changes
Task 5: Test the User Actions
In this task, we will test out the User Actions for Approving and Cancelling Fraud Check Orders.
1. From Postman, send in a couple of additional FRAUD_CHECK_REQUIRED Orders by using the Create CC Order with Fraud Flag TRUE requests.
2. First, we'll use Fluent OMS to Approve a Fraud Check Order:
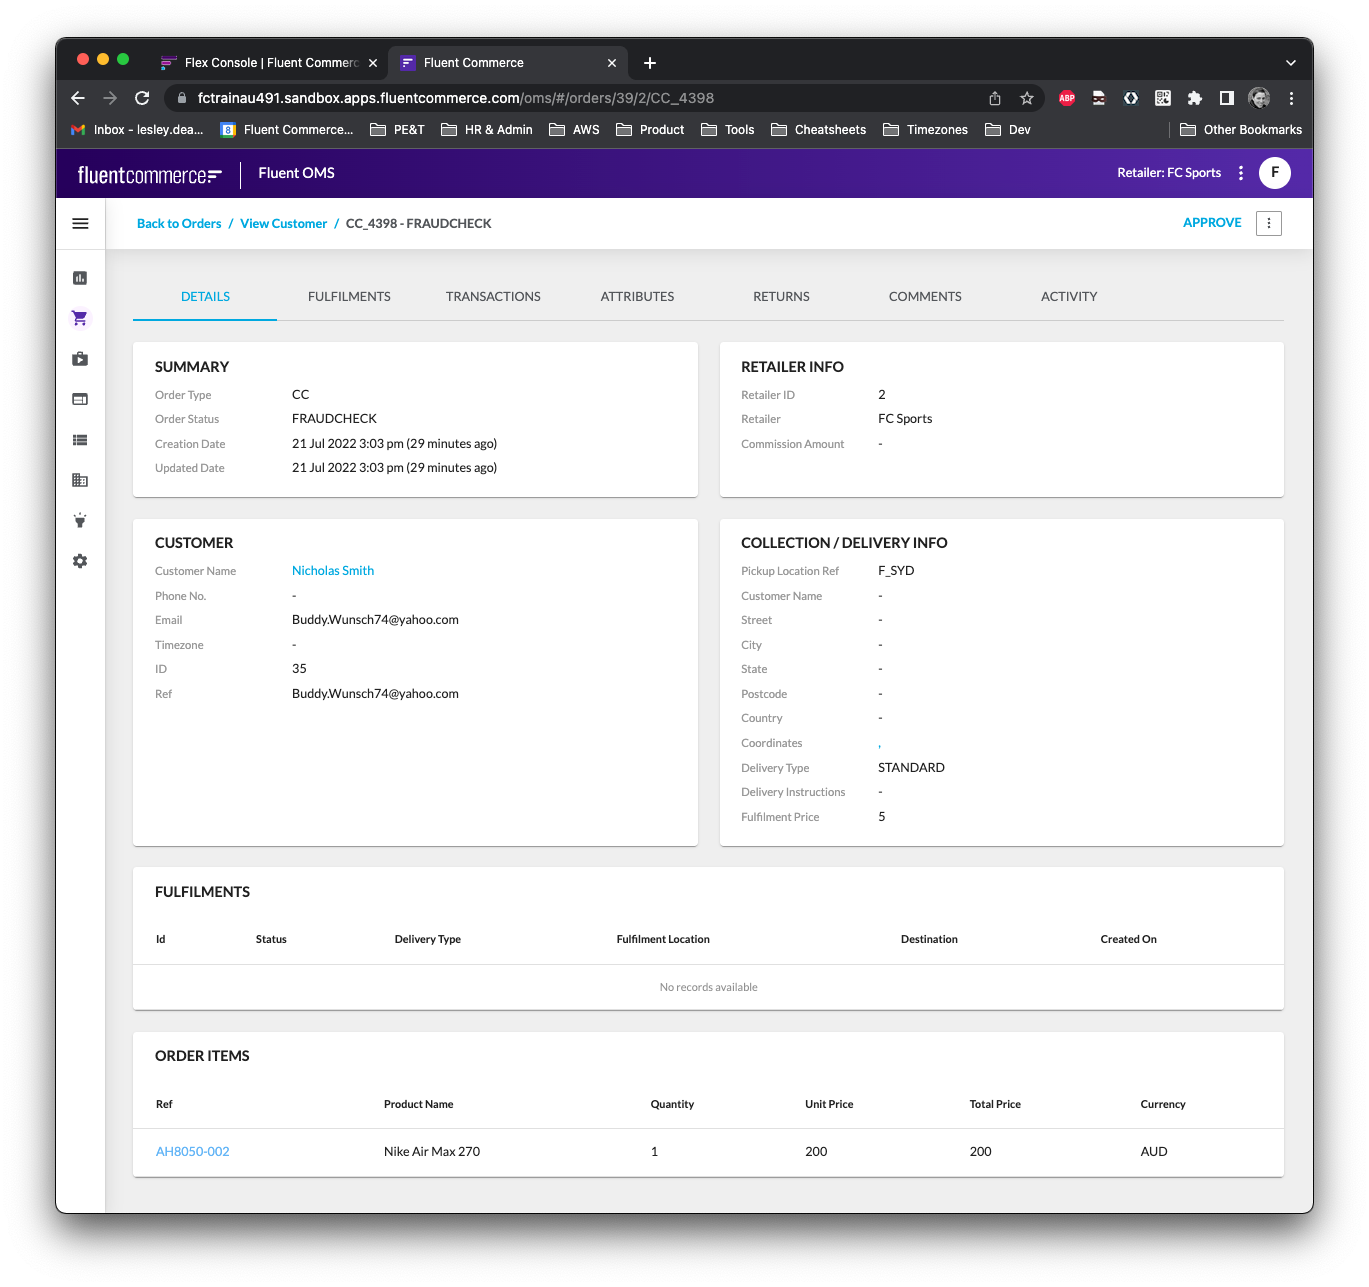
- Click in to the the Order details of an Order in a FRAUDCHECK status, and confirm you can see the APPROVE button on the top right:
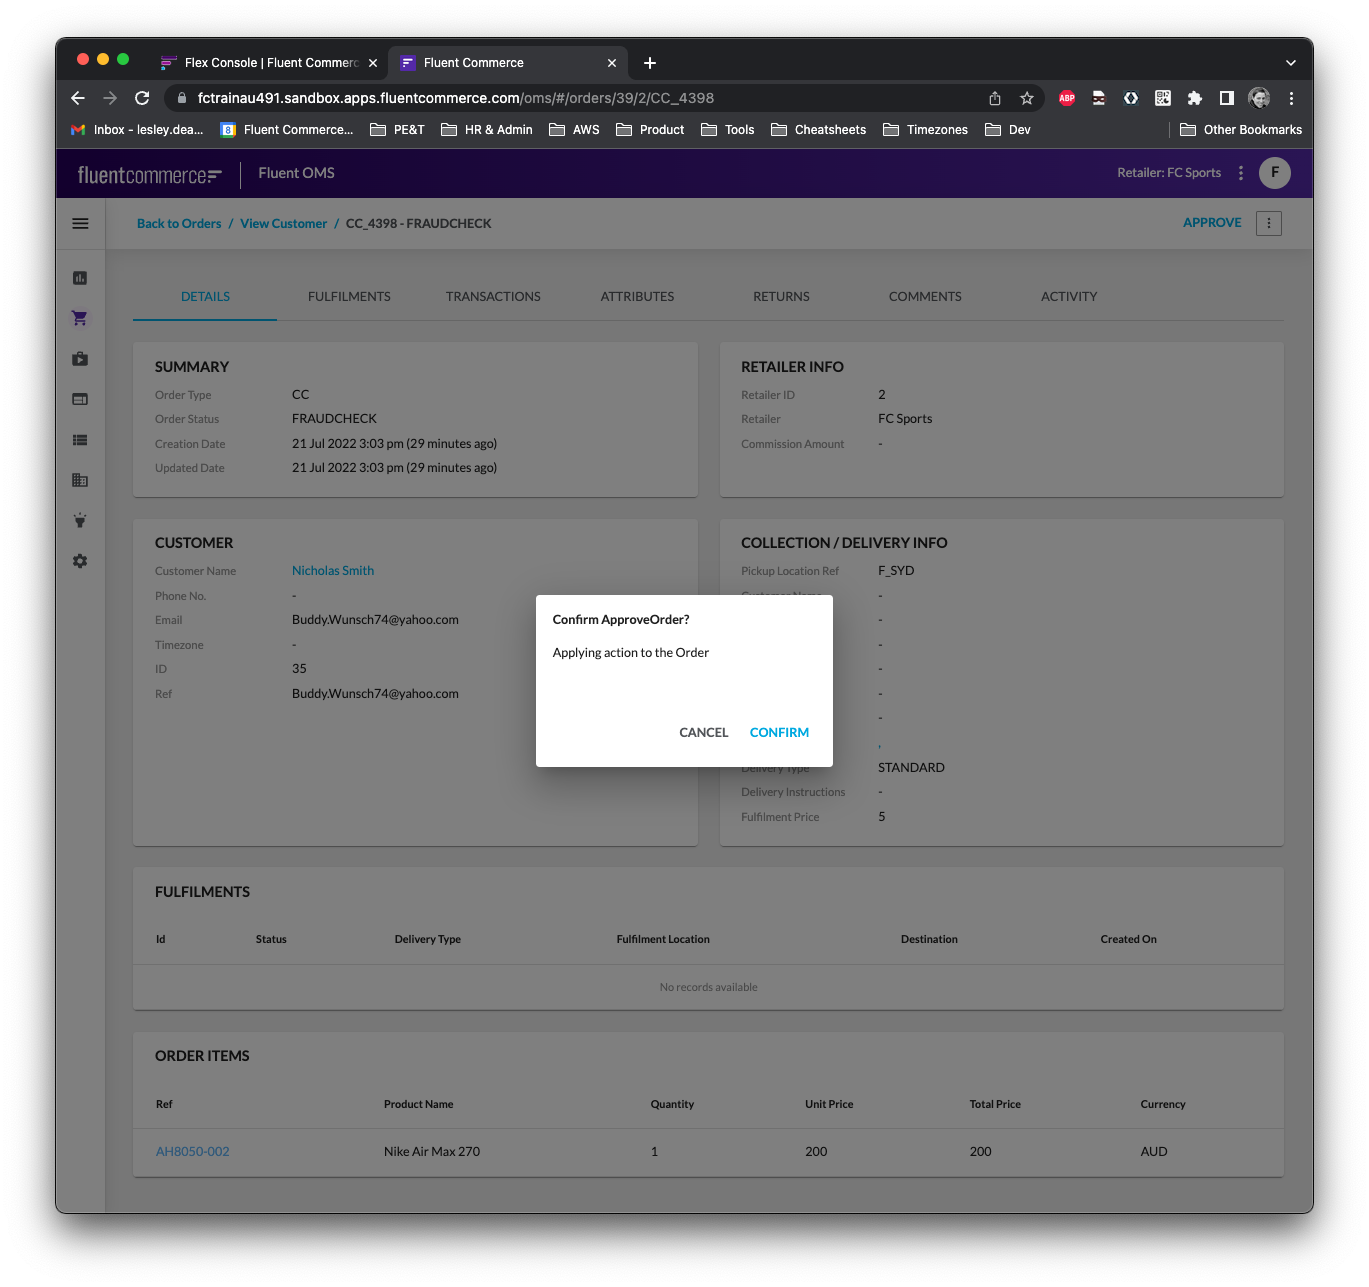
3. Click on the Approve button on the top right, and confirm that you see a Confirmation box:
4. Click on the Confirm button, and watch for the green bordered success message in the top middle of the screen. Refresh the screen to confirm that the Order is now in a BOOKED status:
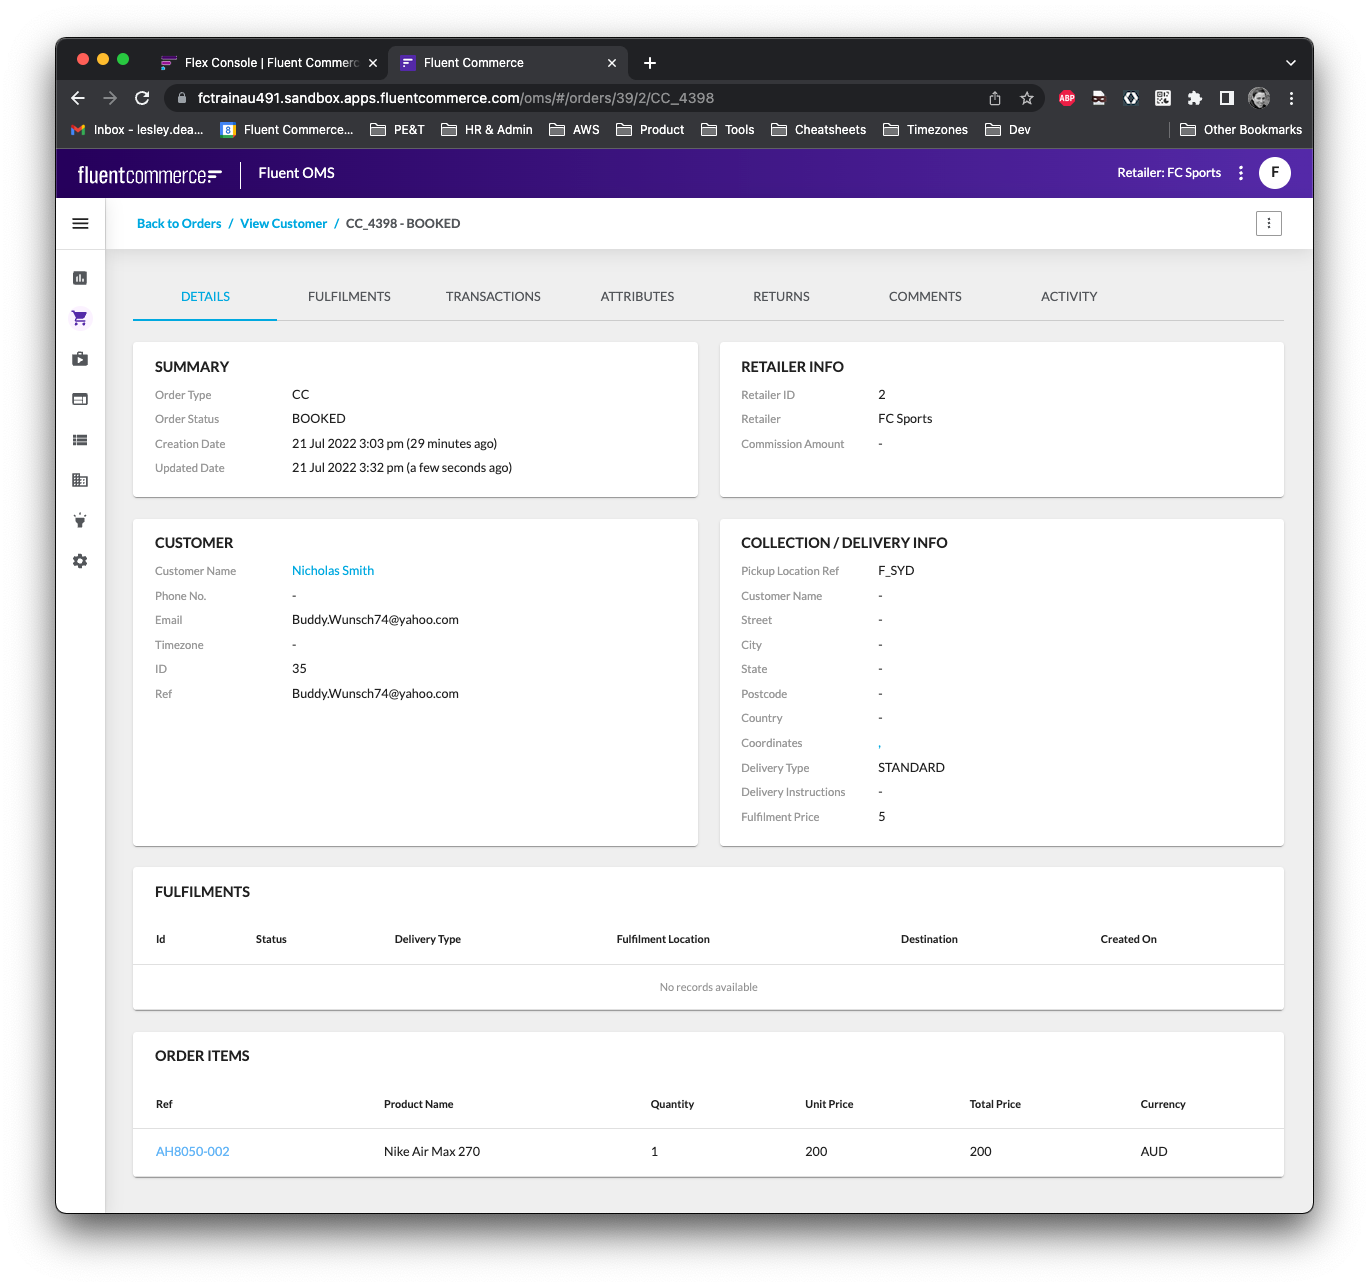
Next we'll test the Cancel for Fraud User Action:
1. Go to the Order Details screen for another Fraud Check Order, and confirm you can see the CANCEL FOR FRAUD button in the secondary menu on the top right:
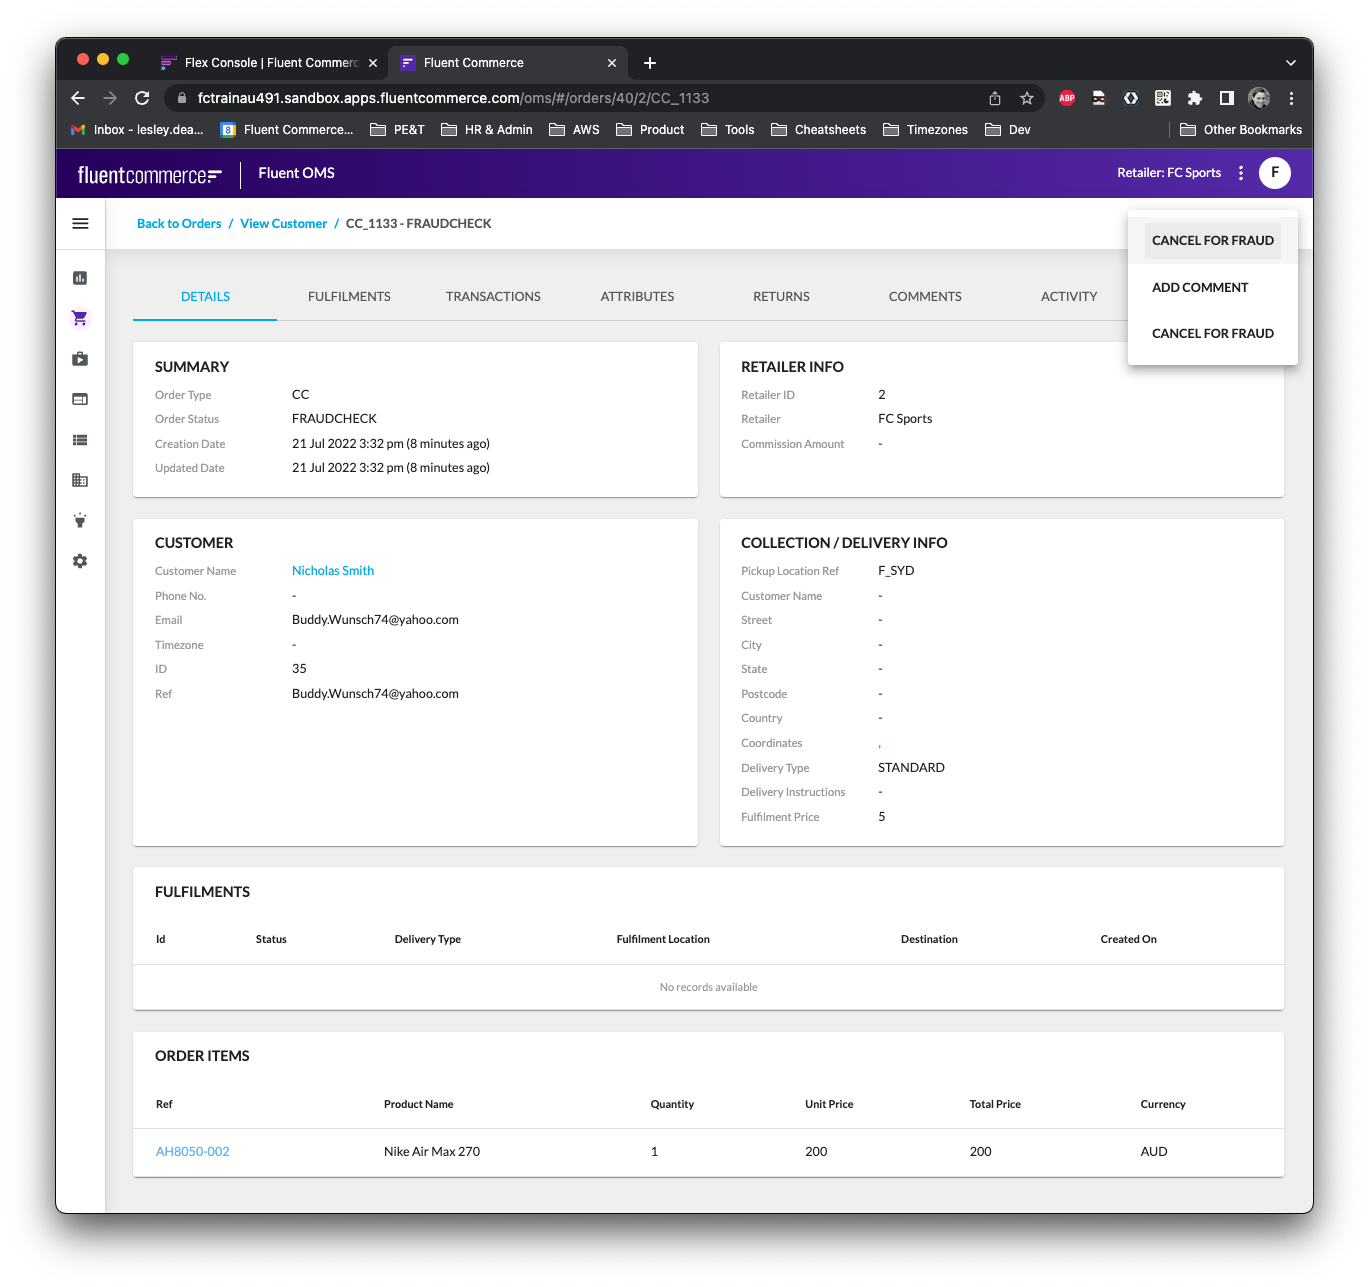
2. Click on the CANCEL FOR FRAUD button, and capture a Reason for Fraud in the form drawer on the right hand side of the screen:
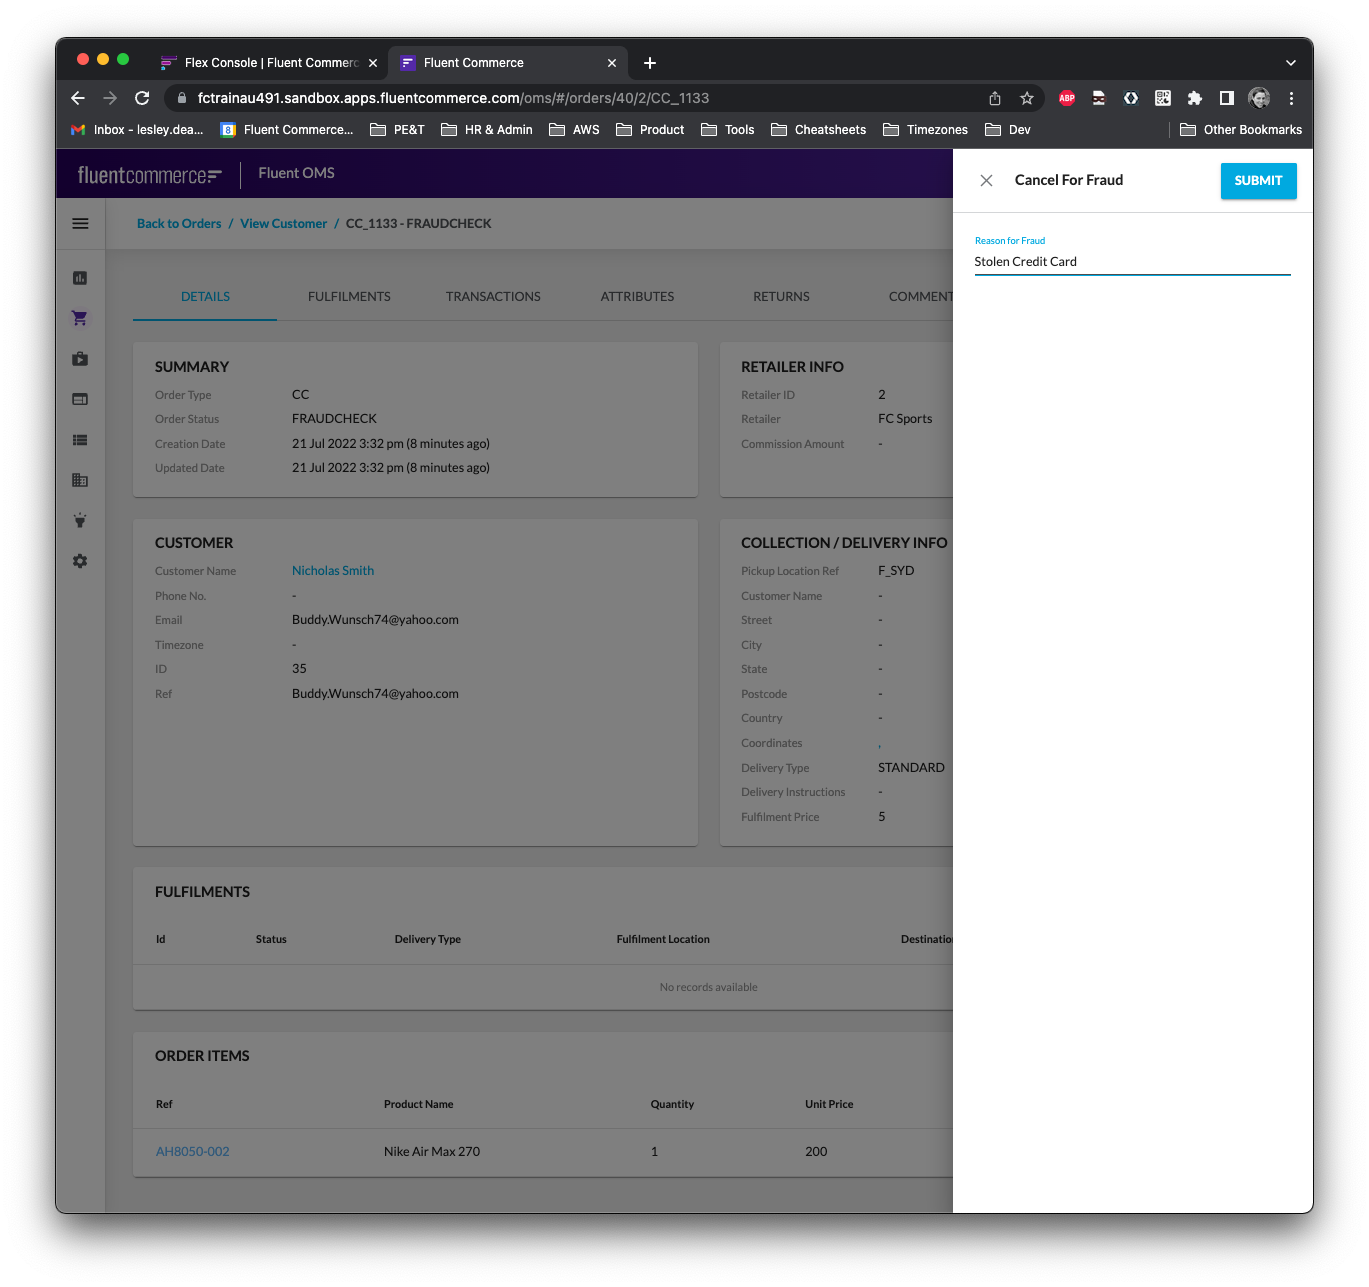
3. Submit the form using the Submit button on the top right of the drawer, and look out for the green bordered success message at the top middle of the screen.
4. Refresh the page, and confirm that the Order is now in a CANCELLED status:
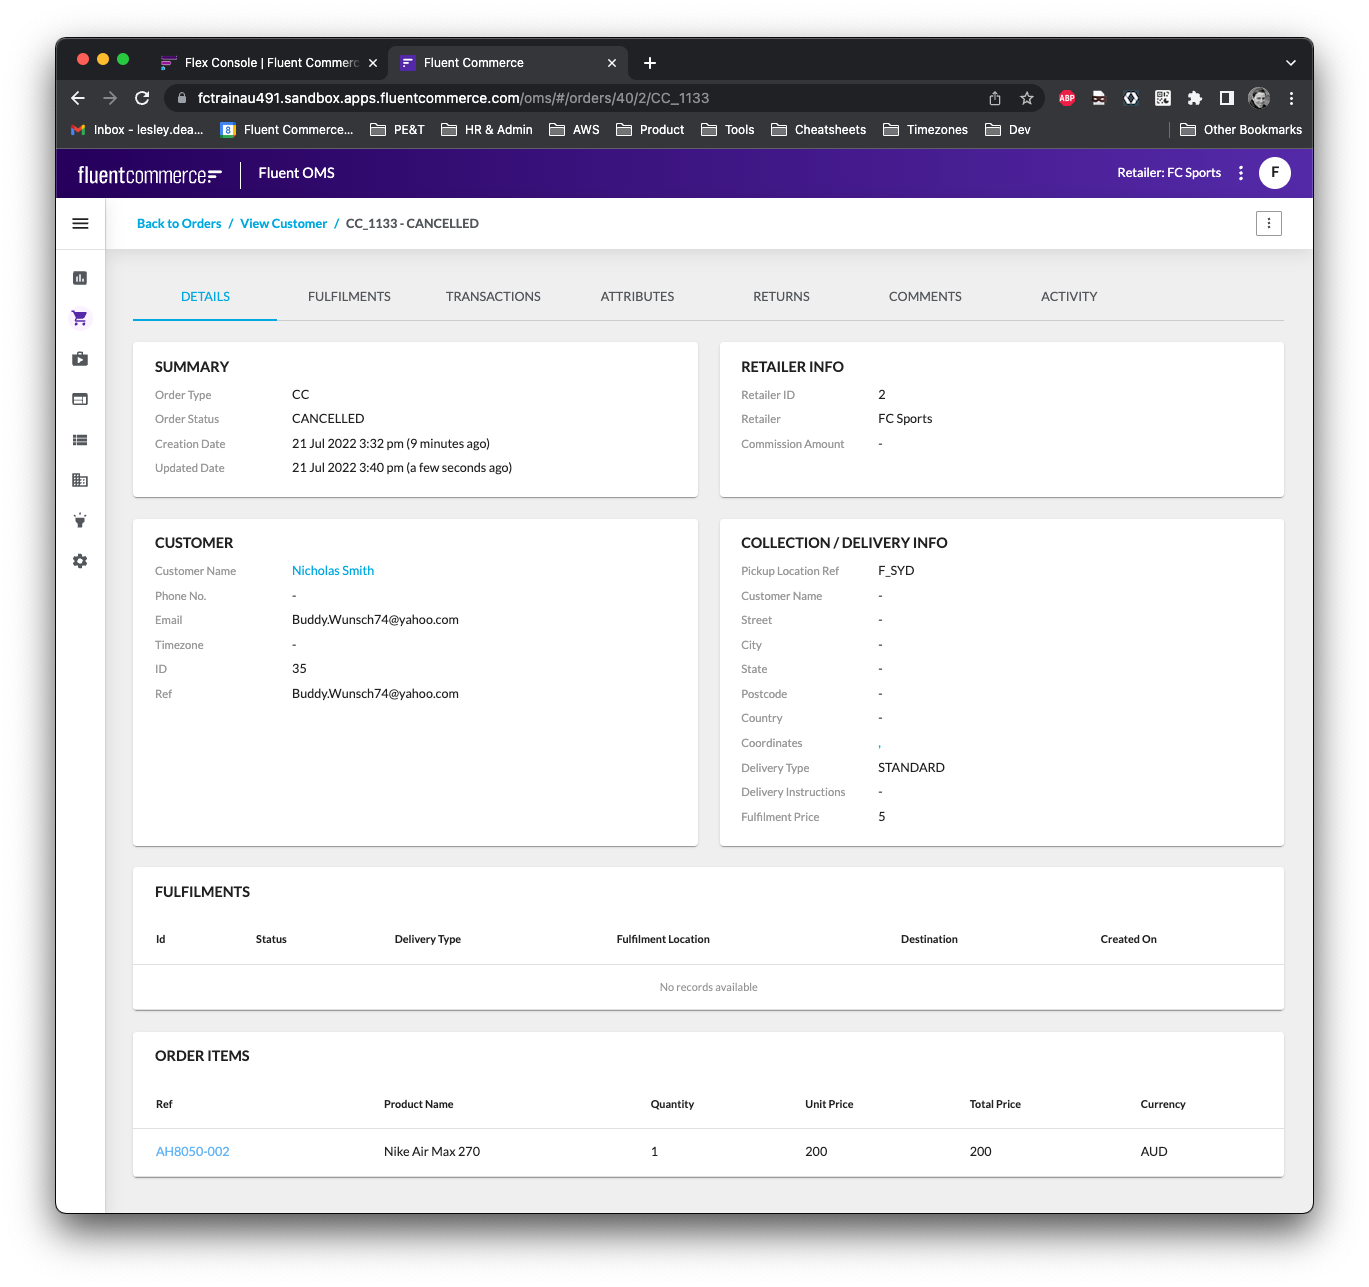
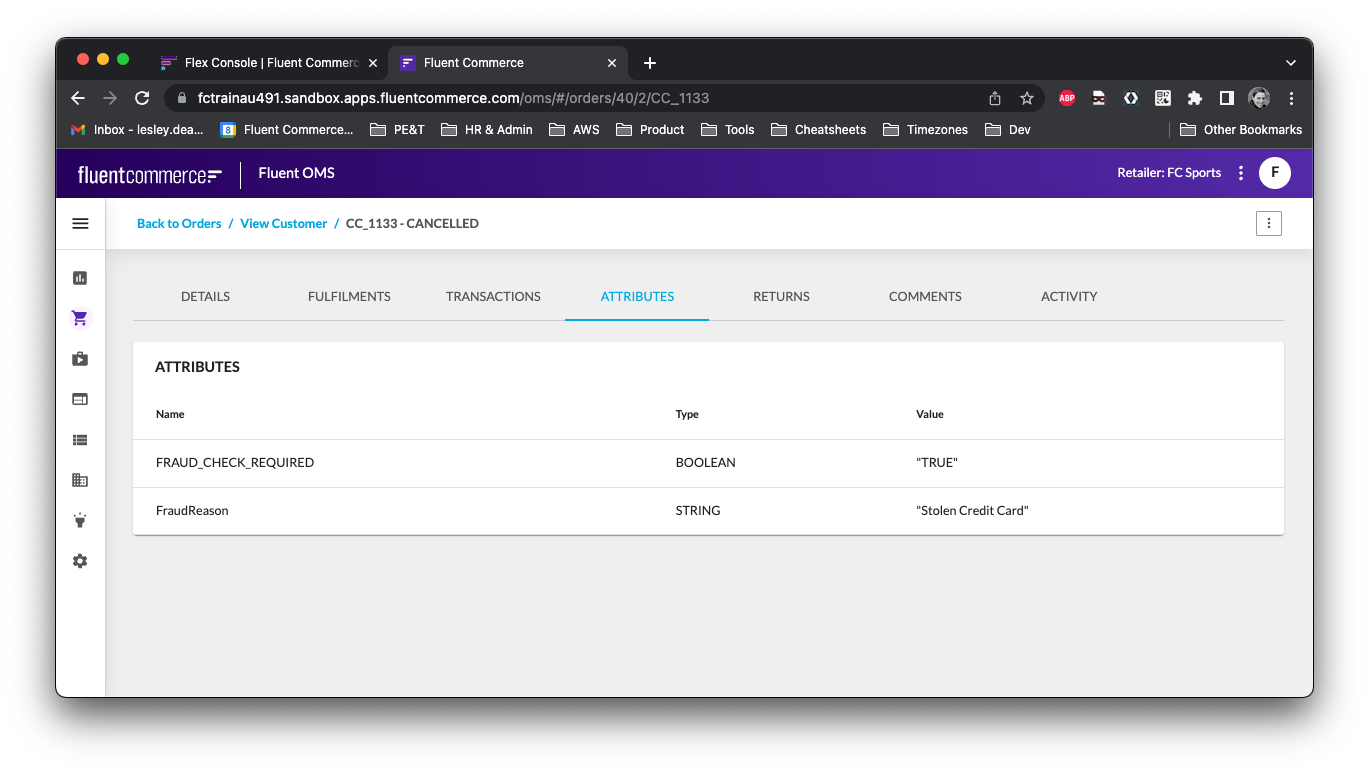
5. Lastly, click on the Attributes tab to view the newly created Order Attribute named FraudReason, and confirm the value is as you entered it:
A Final word before you go:
This Lab demonstrates the configuration capability of the Workflow Framework for implementing business requirements.
This Lab used a very simple use case to teach you the basics, however you will need to design and configure much more advanced business logic on real Client projects, so make sure you have fully completed all steps, and have understood how it all works.
